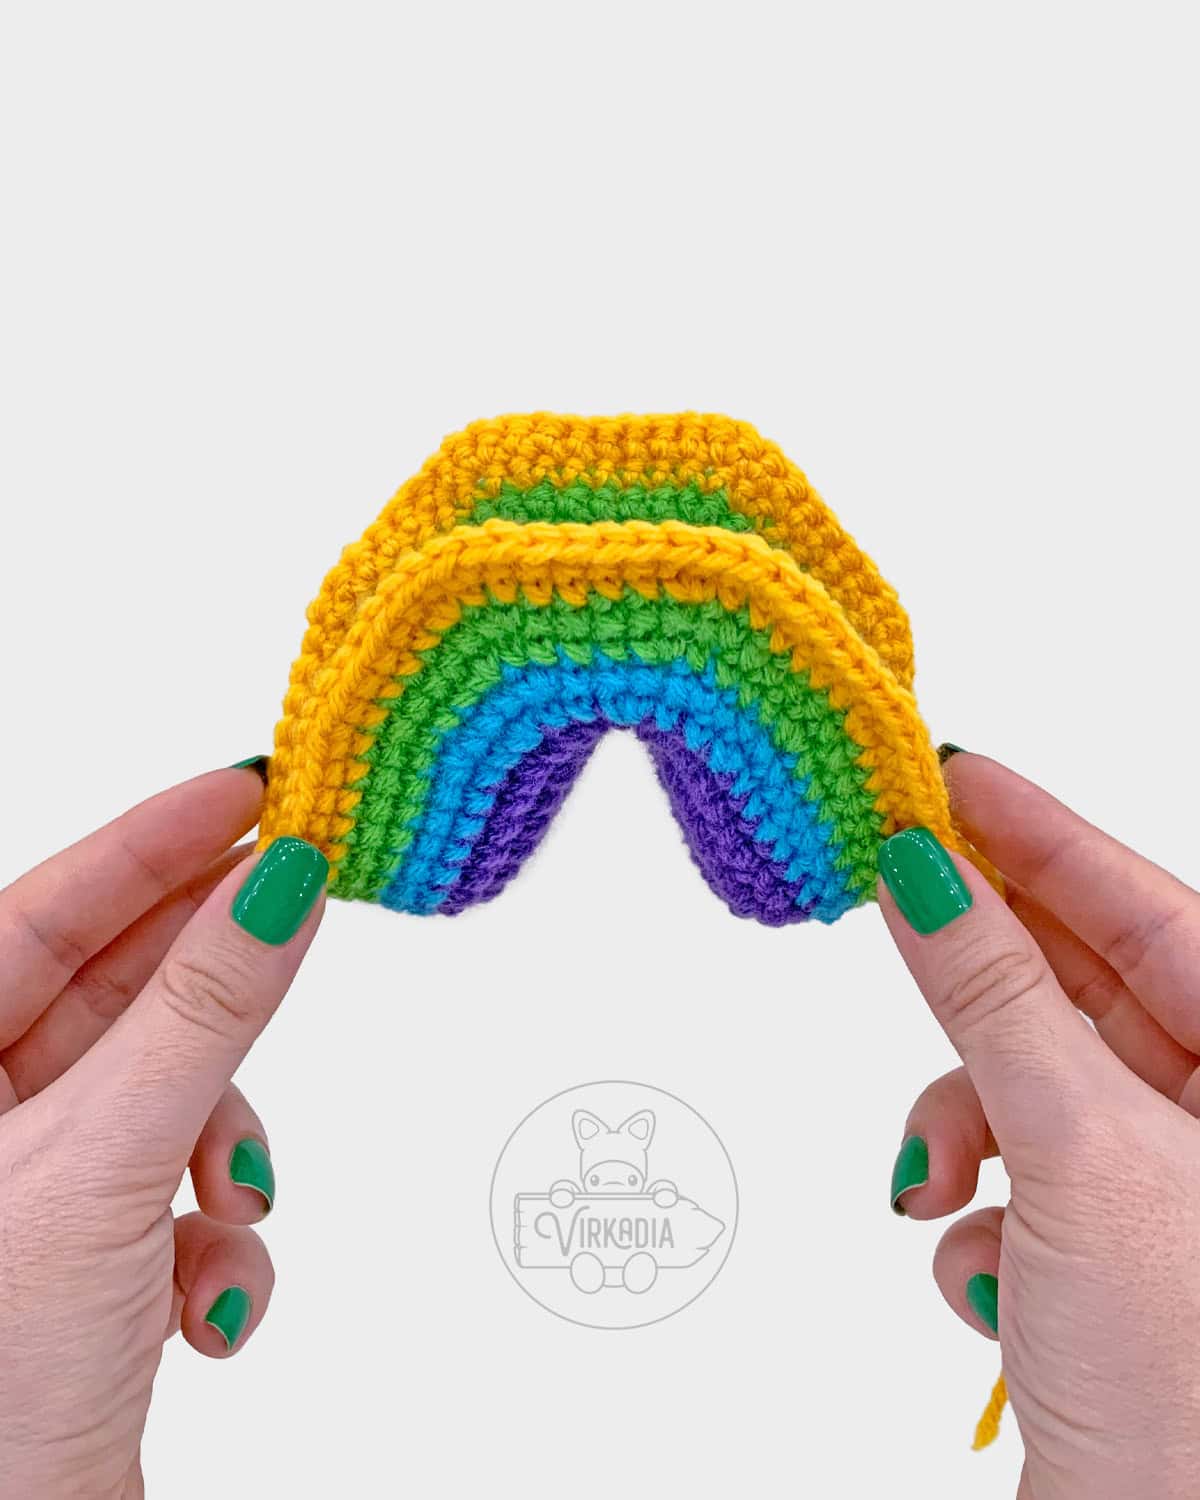
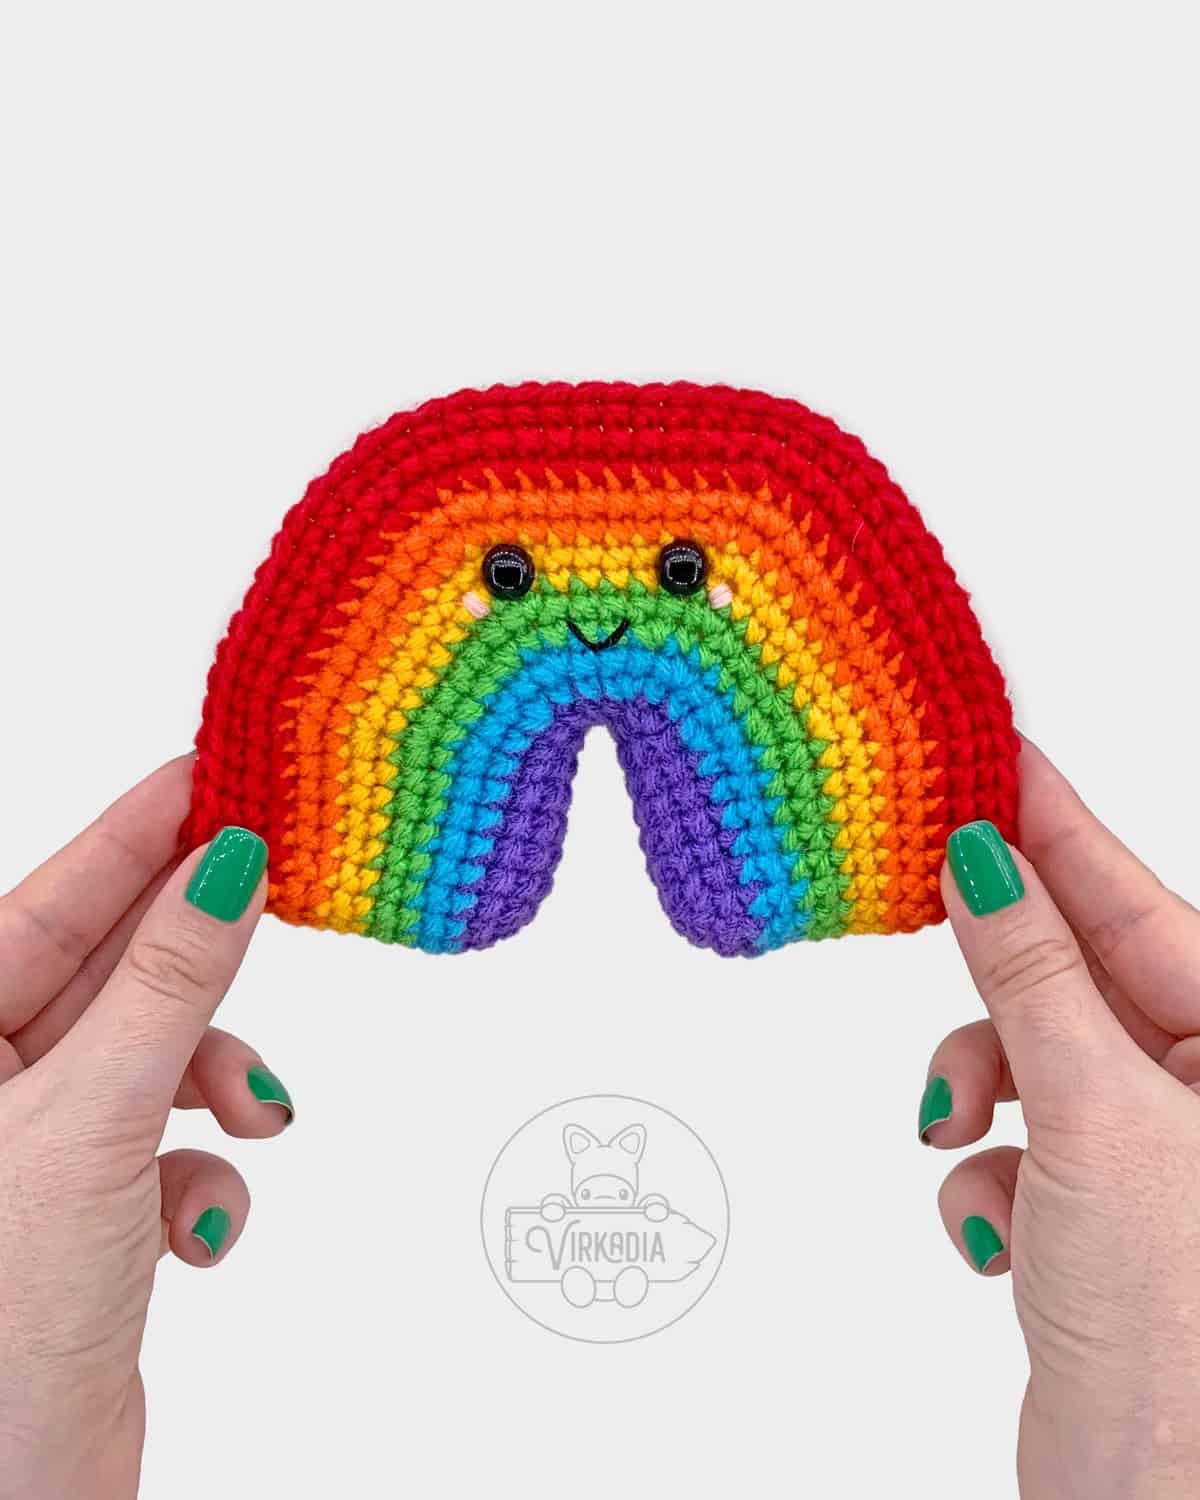
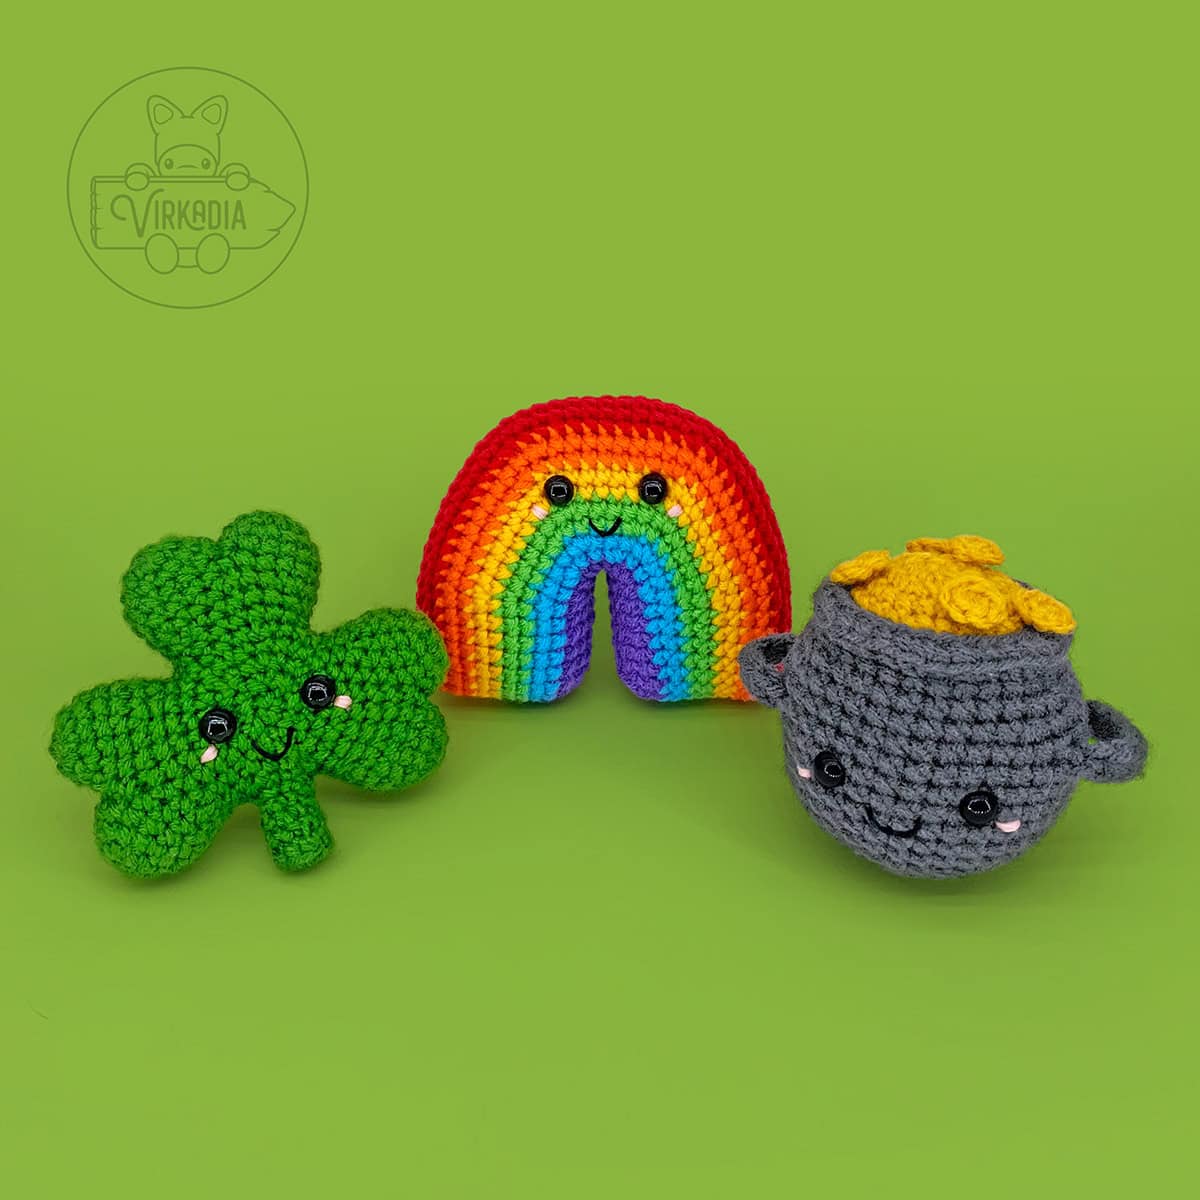
Colored into this free crochet rainbow amigurumi pattern are all the magical moments of St. Patrick’s Day celebrations—a shy sun’s ray peeking out in the middle of a spring shower, the unexpected thrill of a rare rainbow sighting, and the accompanying feeling that maybe there is more magic in the world around us than we give it credit for.
While you patiently stake out, waiting for a leprechaun to lead you to its treasure, there’s no better way to pass the time than with this free crochet rainbow amigurumi pattern!
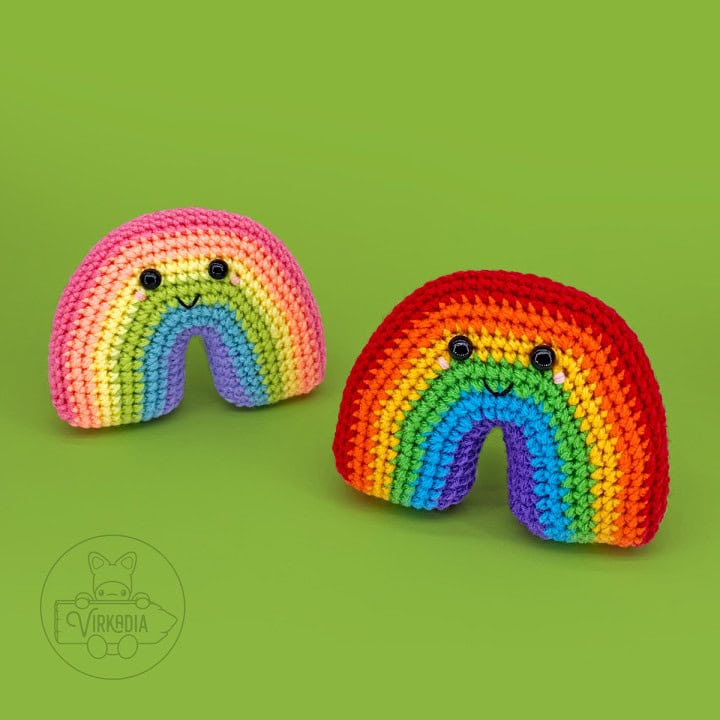
So, without further ado, here is the pattern for the Rainbow Cutie, part three of three in the St. Patrick’s Cuties collection!
Pattern Information | Free Crochet Rainbow Amigurumi
Tired of ads? Check out our ad-free PDF download, available for purchase on Etsy!
And don’t forget to add your project on Ravelry!
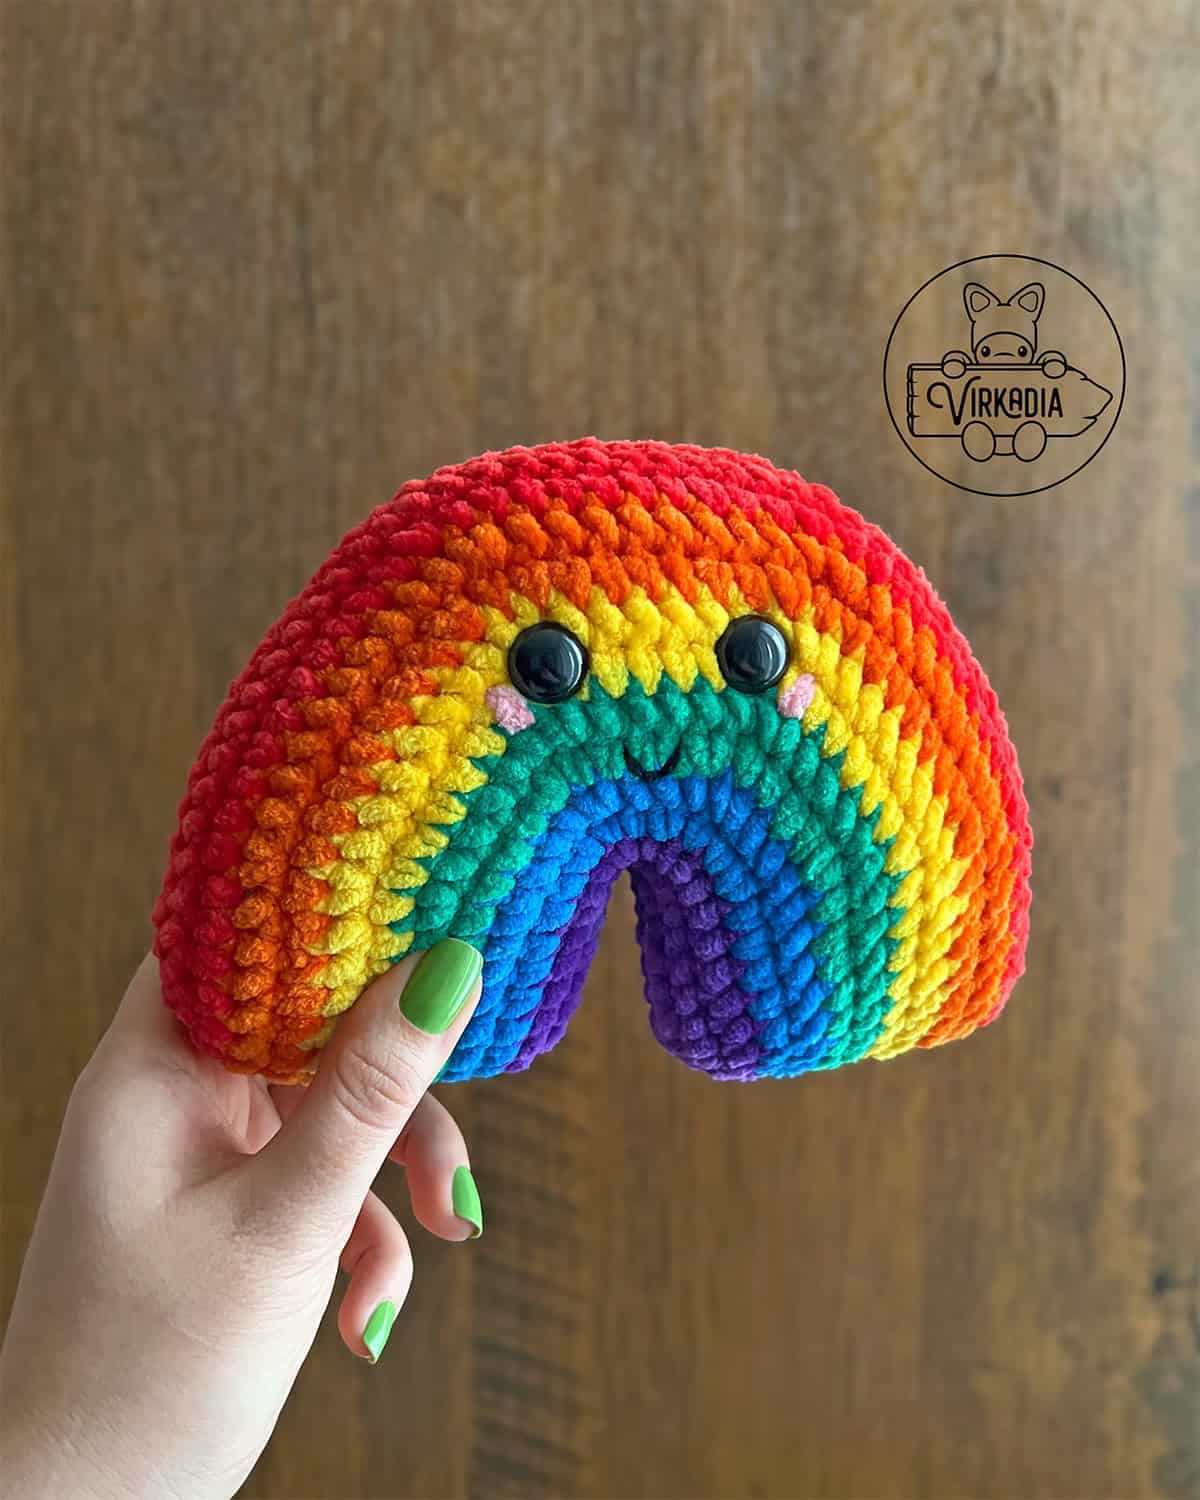
This free crochet rainbow amigurumi pattern has a difficulty rating of intermediate.
The finished dimensions are 4 inches (height) by 5 inches (width) by 1.75 inches (depth).*
You may also make your pieces larger or smaller by increasing or decreasing your yarn weight and/or hook size, respectively.
*Finished dimensions are calculated from a model using medium weight yarn, a size H-8 (5 mm) crochet hook, the YU/YO method and the following gauge: 18 sc x 21 rows = 4 inches.

Supplies:
This list contains affiliate links. If you make a purchase using one of the links below, I may earn a small commission (at no extra cost to you). Thank you for supporting our small business!
- Size H-8 (5 mm) crochet hook
- Medium (4) weight yarn in 6 colors:
- Yarn A – purple (example uses Red Heart Super Saver: Lavender)
- Yarn B – blue (Red Heart Super Saver: Turqua)
- Yarn C – green (Red Heart Super Saver: Spring Green)
- Yarn D – yellow (Big Twist Value: Varsity Gold)
- Yarn E – orange (Big Twist Value: Orange)
- Yarn F – red (Mainstays: Red V)
- 10 mm black safety eyes (x2)
- Black embroidery floss
- Pink embroidery floss (DMC 963 Light Dusty Rose) or pink yarn
- Polyester fiberfill
- Yarn needle
- Scissors
- Stitch markers (optional)
Alternate Yarn Supplies:
Color Variation 2 (as seen on the left in cover photo):
- Medium (4) weight yarn in 6 colors:
- Yarn A – light purple (example uses Red Heart Super Saver: Light Jasmine)
- Yarn B – light blue (Red Heart Super Saver: Aruba Sea)
- Yarn C – light green (Big Twist Value: Slime)
- Yarn D – light yellow (Red Heart Super Saver: Pale Yellow)
- Yarn E – light orange (Caron One Pound: Peach)
- Yarn F – pink (Red Heart Super Saver: Perfect Pink)
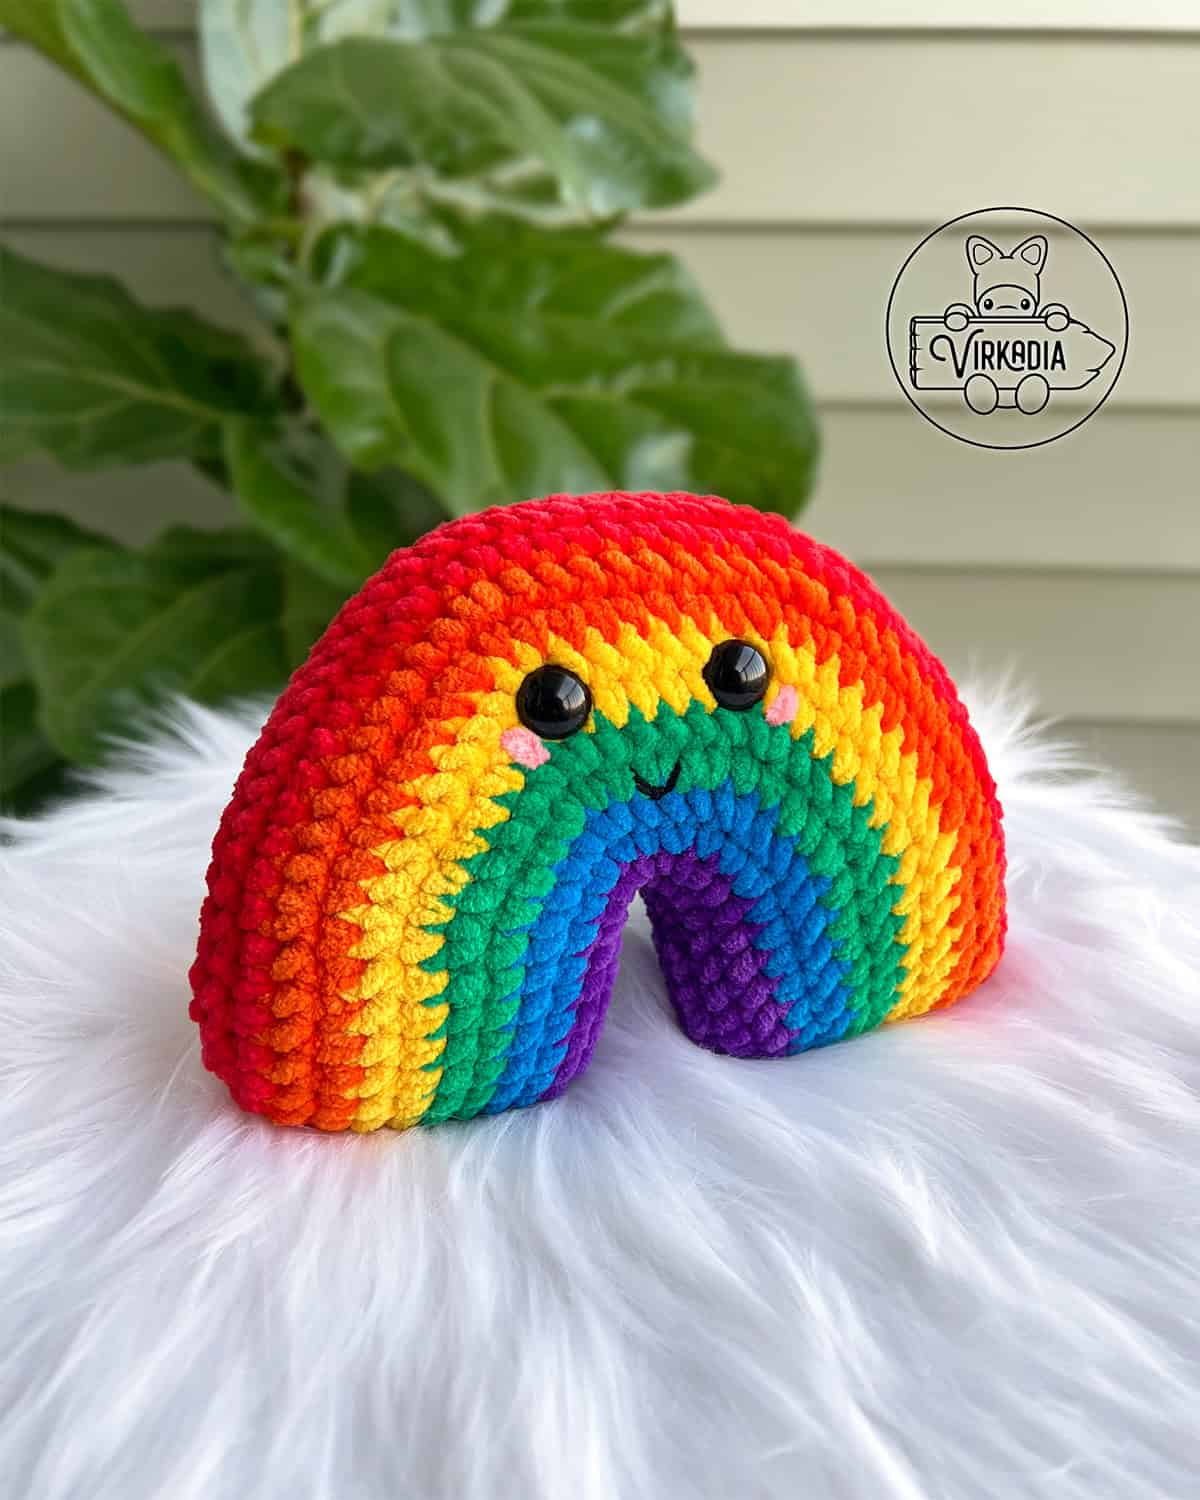
Color Variation 3 (as seen in the photo below):
The chunky example of this pattern measures 5 inches (height) by 7 inches (width) by 2.5 inches (depth) using the following gauge: 16 sc x 15 rows = 4 inches.
All supplies remain the same, except for the following replacements:
- Super Bulky (6) weight yarn in 6 colors (example uses Premier Parfait Chunky yarn):
- Yarn A – purple (Limited Edition Parfait Chunky: Acai)
- Yarn B – blue (Parfait Chunky: Rock Candy)
- Yarn C – green (Parfait Chunky: Seaweed Salad)
- Yarn D – yellow (Parfait Chunky: Summer Squash)
- Yarn E – orange (Parfait Chunky: Carrot)
- Yarn F – red (Parfait Chunky: Poppy)
- 14 mm black safety eyes (x2)
- Pink yarn (Parfait Chunky: Pink Lemonade)
- Black embroidery floss (doubled)
Terminology:
This free crochet rainbow amigurumi pattern uses English (US) terminology:
- st (sts) = stitch (stitches)
- ch = chain stitch
- sl st = slip stitch
- sc = single crochet
- sc2tog = single crochet 2 together (over the span of 2 stitches), also known as a decrease
- sc3tog = single crochet 3 together (over the span of 3 stitches)
Please note that this pattern is written so that each crochet stitch abbreviation is attached to a number, such as 1sc, 2sc, etc. This number denotes how many of that stitch is to be worked into the same stitch.
You can learn more about how to read Virkadia patterns on our Pattern Help FAQ page!
Special Stitch Instructions:
Please review our special stitch instructions on our Stitch Tutorials FAQ before beginning, as some techniques may be unique to this pattern.
You can also watch our amigurumi techniques video tutorial for all of our tips and tricks for improving your project!
This free crochet rainbow amigurumi pattern uses the following special stitch tutorials:
- Single Crochet (YU/YO Method)
- Invisible Decrease
- Joining Rounds
This pattern is worked in the round, with each round joined at the end with a slip stitch. Unless otherwise instructed, the first stitch of your next round will always be worked into the same stitch as your joining slip stitch has been worked into.
Be sure to always keep the ‘right side’ of your stitches facing outwards as you work. The right side is the front side of the stitch that is facing you as you are completing each stitch.
Pattern Instructions | Free Crochet Rainbow Amigurumi
Tired of ads? Check out our ad-free PDF download, available for purchase on Etsy!
And don’t forget to add your project on Ravelry!
Crochet Rainbow – Rounds 1 to 5:
With yarn A (purple), chain 17.
Rnd 1: beginning in 2nd ch from hook, *1sc into each of next 15 sts, 2sc into next st,* working into other side of ch sts, repeat from * to * 1 time, sl st into 1st st to join, ch 1 (34).
Rnd 2: [3sc into next st, 1sc into each of next 14 sts, 3sc into next st, 1sc into next st] 2 times, join, ch 1 (42).
Rnd 3: *1sc into each of next 7 sts, [1sc into next st, 2sc into next st] 3 times, 1sc into each of next 8 sts,* repeat from * to * 1 time, join (48).
Fasten off yarn A and leave a short tail for tying.
Join yarn B (blue) by inserting your hook into the first stitch of the next round. Pull up a loop of yarn B and ch 1.
Tie the tails of both yarn A and yarn B together on the interior of your piece to secure your ends and cut any excess tail.
Rnd 4: *1sc into each of next 7 sts, [2sc into next st, 1sc into each of next 2 sts] 3 times, 1sc into each of next 8 sts,* repeat from * to * 1 time, join, ch 1 (54).
Rnd 5: *1sc into each of next 7 sts, [1sc into each of next 3 sts, 2sc into next st] 3 times, 1sc into each of next 8 sts,* repeat from * to * 1 time, join (60).
Fasten off yarn B and leave a short tail for tying.
Crochet Rainbow – Rounds 6 to 9:
Join yarn C (green) by inserting your hook into the first stitch of the next round. Pull up a loop of yarn C and ch 1.
Tie the tails of both yarn B and yarn C together on the interior of your piece to secure your ends and cut any excess tail.
Rnd 6: *1sc into each of next 7 sts, [2sc into next st, 1sc into each of next 4 sts] 3 times, 1sc into each of next 8 sts,* repeat from * to * 1 time, join, ch 1 (66).
Rnd 7: *1sc into each of next 7 sts, [1sc into each of next 5 sts, 2sc into next st] 3 times, 1sc into each of next 8 sts,* repeat from * to * 1 time, join (72).
Fasten off yarn C and leave a short tail for tying.
Join yarn D (yellow) by inserting your hook into the first stitch of the next round. Pull up a loop of yarn D and ch 1.
Tie the tails of both yarn C and yarn D together on the interior of your piece to secure your ends and cut any excess tail.
Rnd 8: *1sc into each of next 7 sts, [2sc into next st, 1sc into each of next 6 sts] 3 times, 1sc into each of next 8 sts,* repeat from * to * 1 time, join, ch 1 (78).
Rnd 9: *1sc into each of next 7 sts, [1sc into each of next 7 sts, 2sc into next st] 3 times, 1sc into each of next 8 sts,* repeat from * to * 1 time, join (84).
Fasten off yarn D and leave a short tail for tying.
Crochet Rainbow – Rounds 10 to 14:
Join yarn E (orange) by inserting your hook into the first stitch of the next round. Pull up a loop of yarn E and ch 1.
Tie the tails of both yarn D and yarn E together on the interior of your piece to secure your ends and cut any excess tail.
Rnd 10: *1sc into each of next 7 sts, [2sc into next st, 1sc into each of next 8 sts] 3 times, 1sc into each of next 8 sts,* repeat from * to * 1 time, join, ch 1 (90).
Rnd 11: *1sc into each of next 7 sts, [1sc into each of next 9 sts, 2sc into next st] 3 times, 1sc into each of next 8 sts,* repeat from * to * 1 time, join (96).
Fasten off yarn E and leave a short tail for tying.
Join yarn F (red) by inserting your hook into the first stitch of the next round. Pull up a loop of yarn F and ch 1.
Tie the tails of both yarn E and yarn F together on the interior of your piece to secure your ends and cut any excess tail.
Rnd 12: *1sc into each of next 7 sts, [2sc into next st, 1sc into each of next 10 sts] 3 times, 1sc into each of next 8 sts,* repeat from * to * 1 time, join, ch 1 (102).
Rnd 13: [sc3tog over next 3 sts, 1sc into each of next 44 sts, sc3tog over next 3 sts, 1sc into next st] 2 times, join, ch 1 (94).
Rnd 14: sk next st, 1sc into each of next 44 sts, sc3tog over next 3 sts, 1sc into each of next 44 sts, sc2tog over next 2 sts, join (90).
Fasten off yarn F and leave an 18 inch tail for sewing closed.
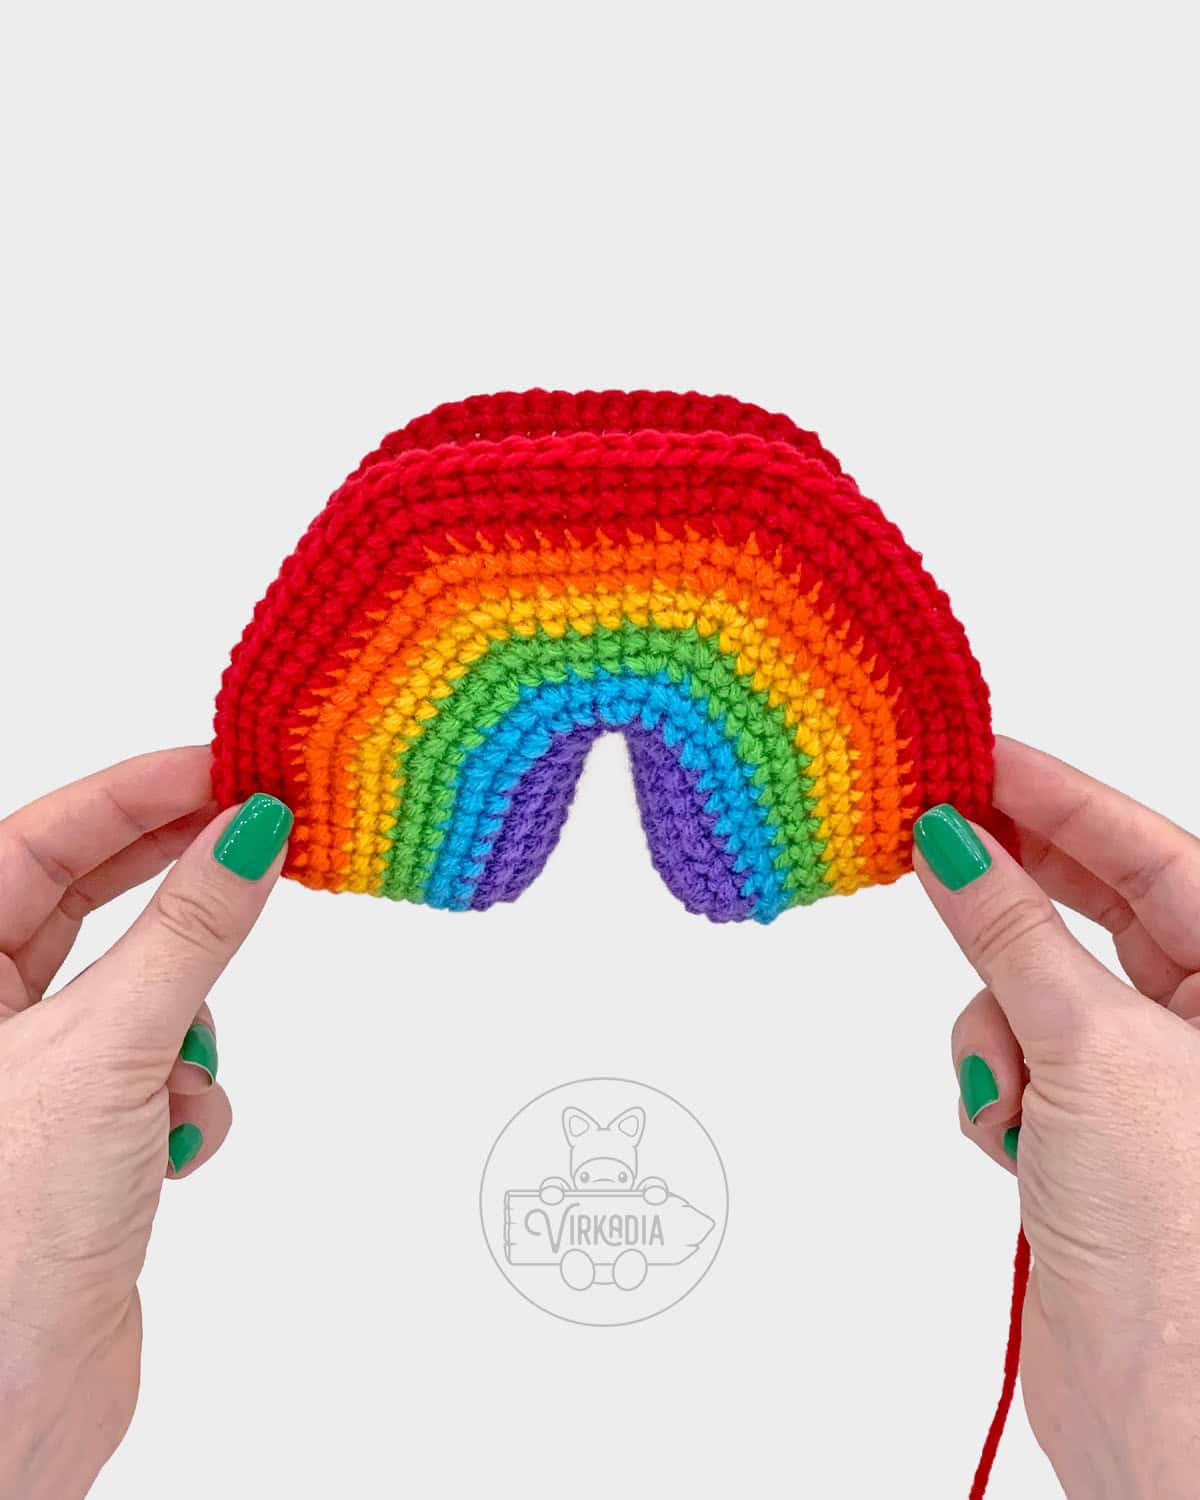
Follow the instructions below for adding the eyes, mouth, and blush before stuffing and sewing closed.
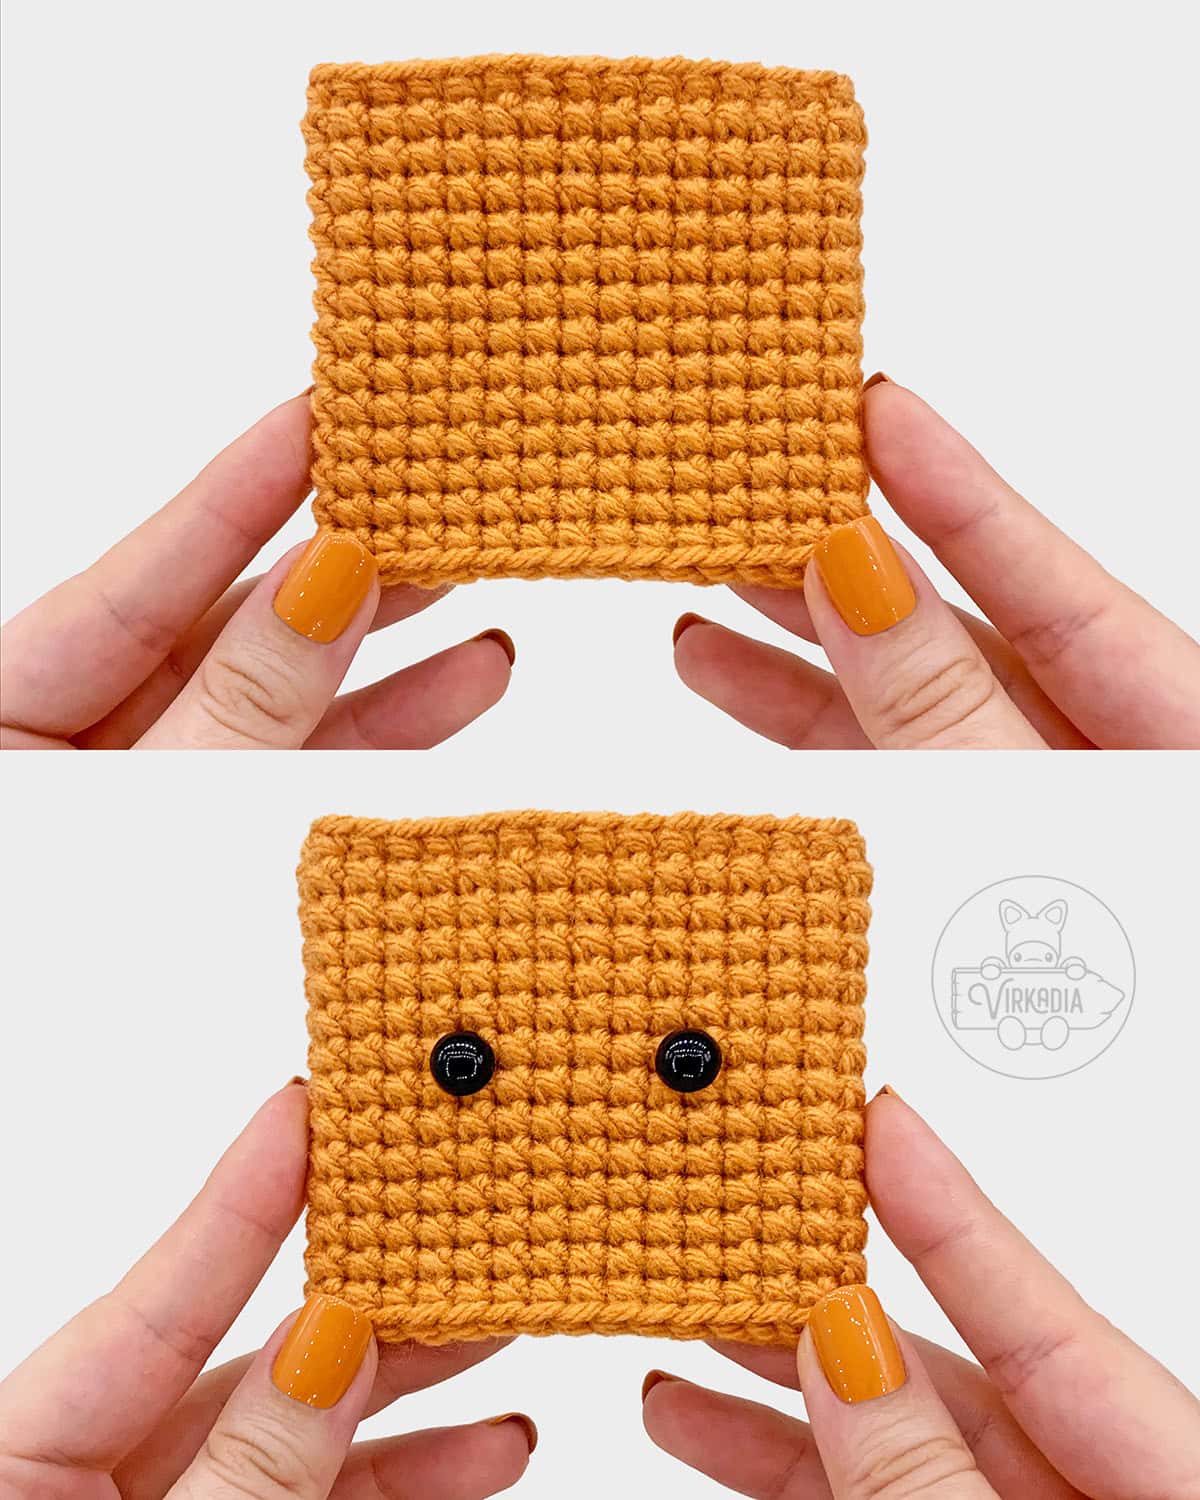
Adding Eyes:
Using the example piece below as reference, insert both safety eyes through the front of your piece, centered at the top of the arch of the rainbow.
The safety eyes should be inserted between rounds 8 and 9 and should sit 6 stitches apart.
Adding Mouth:
The tutorial images below show how to embroider the face exactly as it appears on the Rainbow Cutie’s two companion patterns in the St. Patrick's Cuties set. If you want all three patterns to exactly match, you may follow the images below, unchanged.
For this option, the mouth should be embroidered over top of round 7 and be centered between the eyes. The mouth will be 2 stitches wide and 1 round tall.
However, since the center stitches of this rainbow pattern arch slightly upwards, you may also opt to position the mouth one round lower—as seen in the finished Rainbow Cutie example photos—which helps to counteract this skewing and thereby visually match better with the rest of the set.
For this alternative option, the mouth should be embroidered over top of round 6, not 7. The mouth will still be 2 stitches wide and 1 round tall and will otherwise be embroidered the same.
Choose whichever method you prefer and, using the example piece below as reference, embroider a mouth using black embroidery floss.
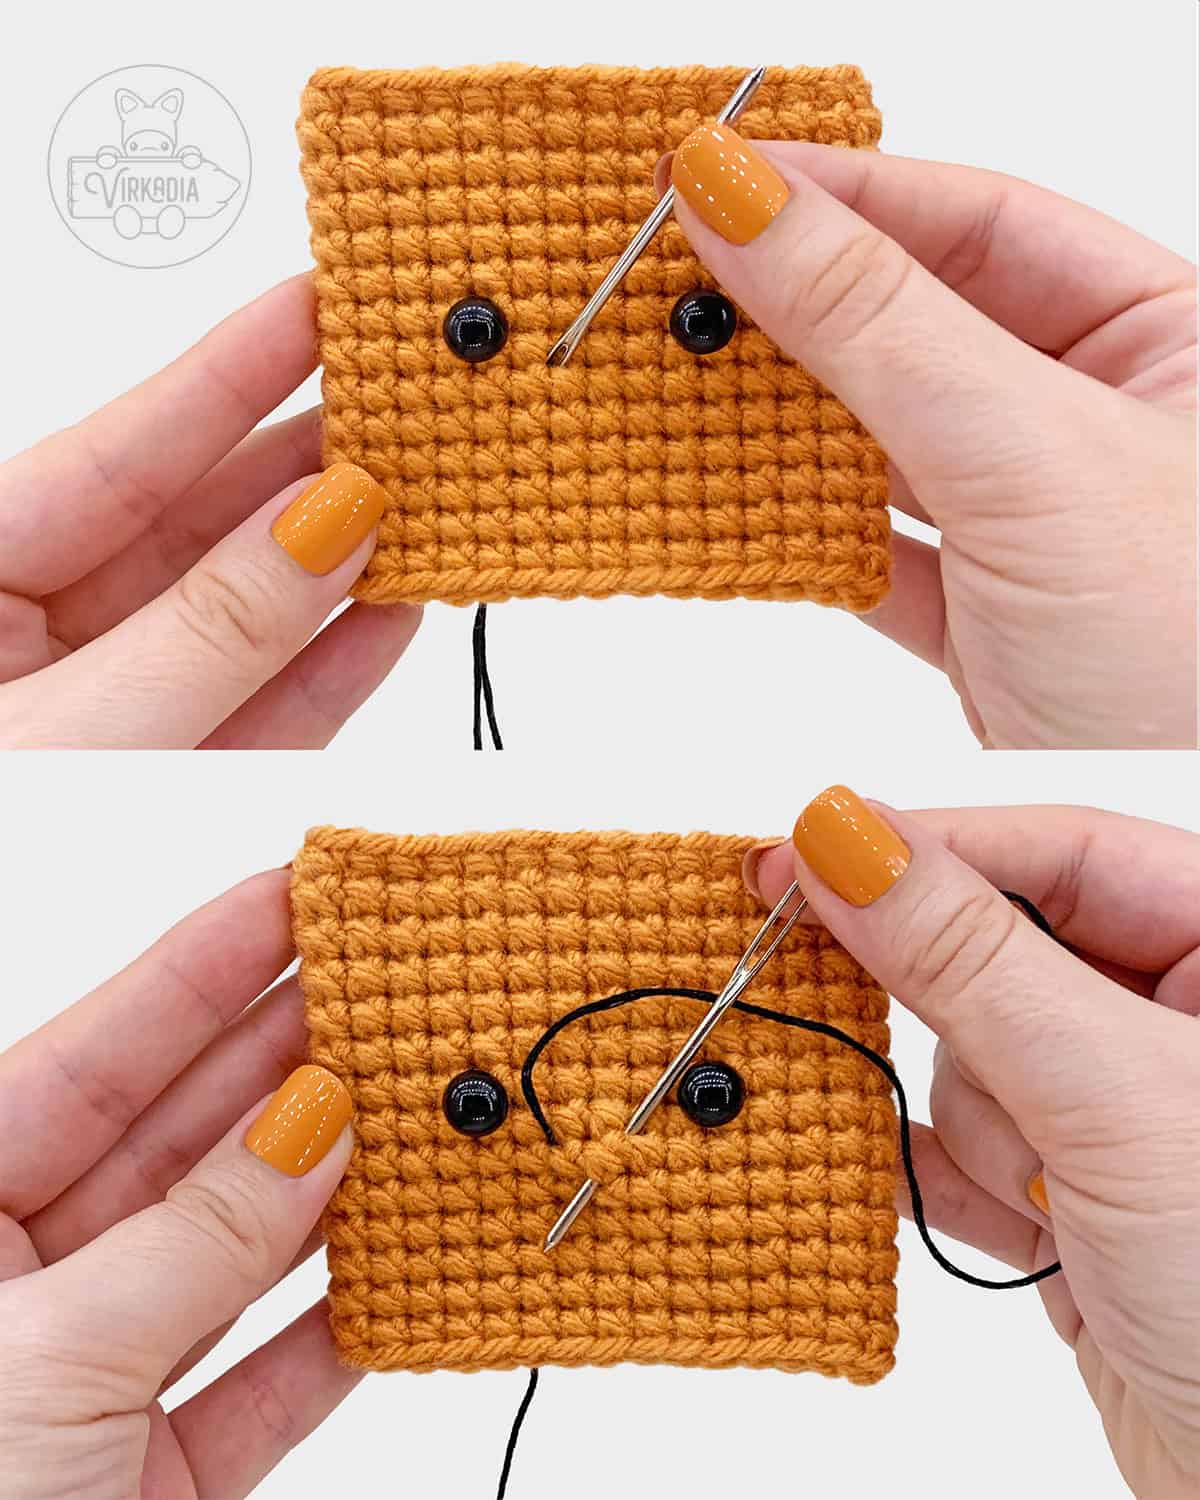
Begin by inserting your needle from inside to outside, 1 round down (or 2 rounds down, if matching the example Rainbow Cutie) and 2 stitches to the right from where you’ve inserted the left eye. Pull through and leave some tail for tying later.
Then, insert your needle again, 2 stitches to the right, and out again, 1 round down and 1 stitch to the left from where you’ve just inserted, and pull through.
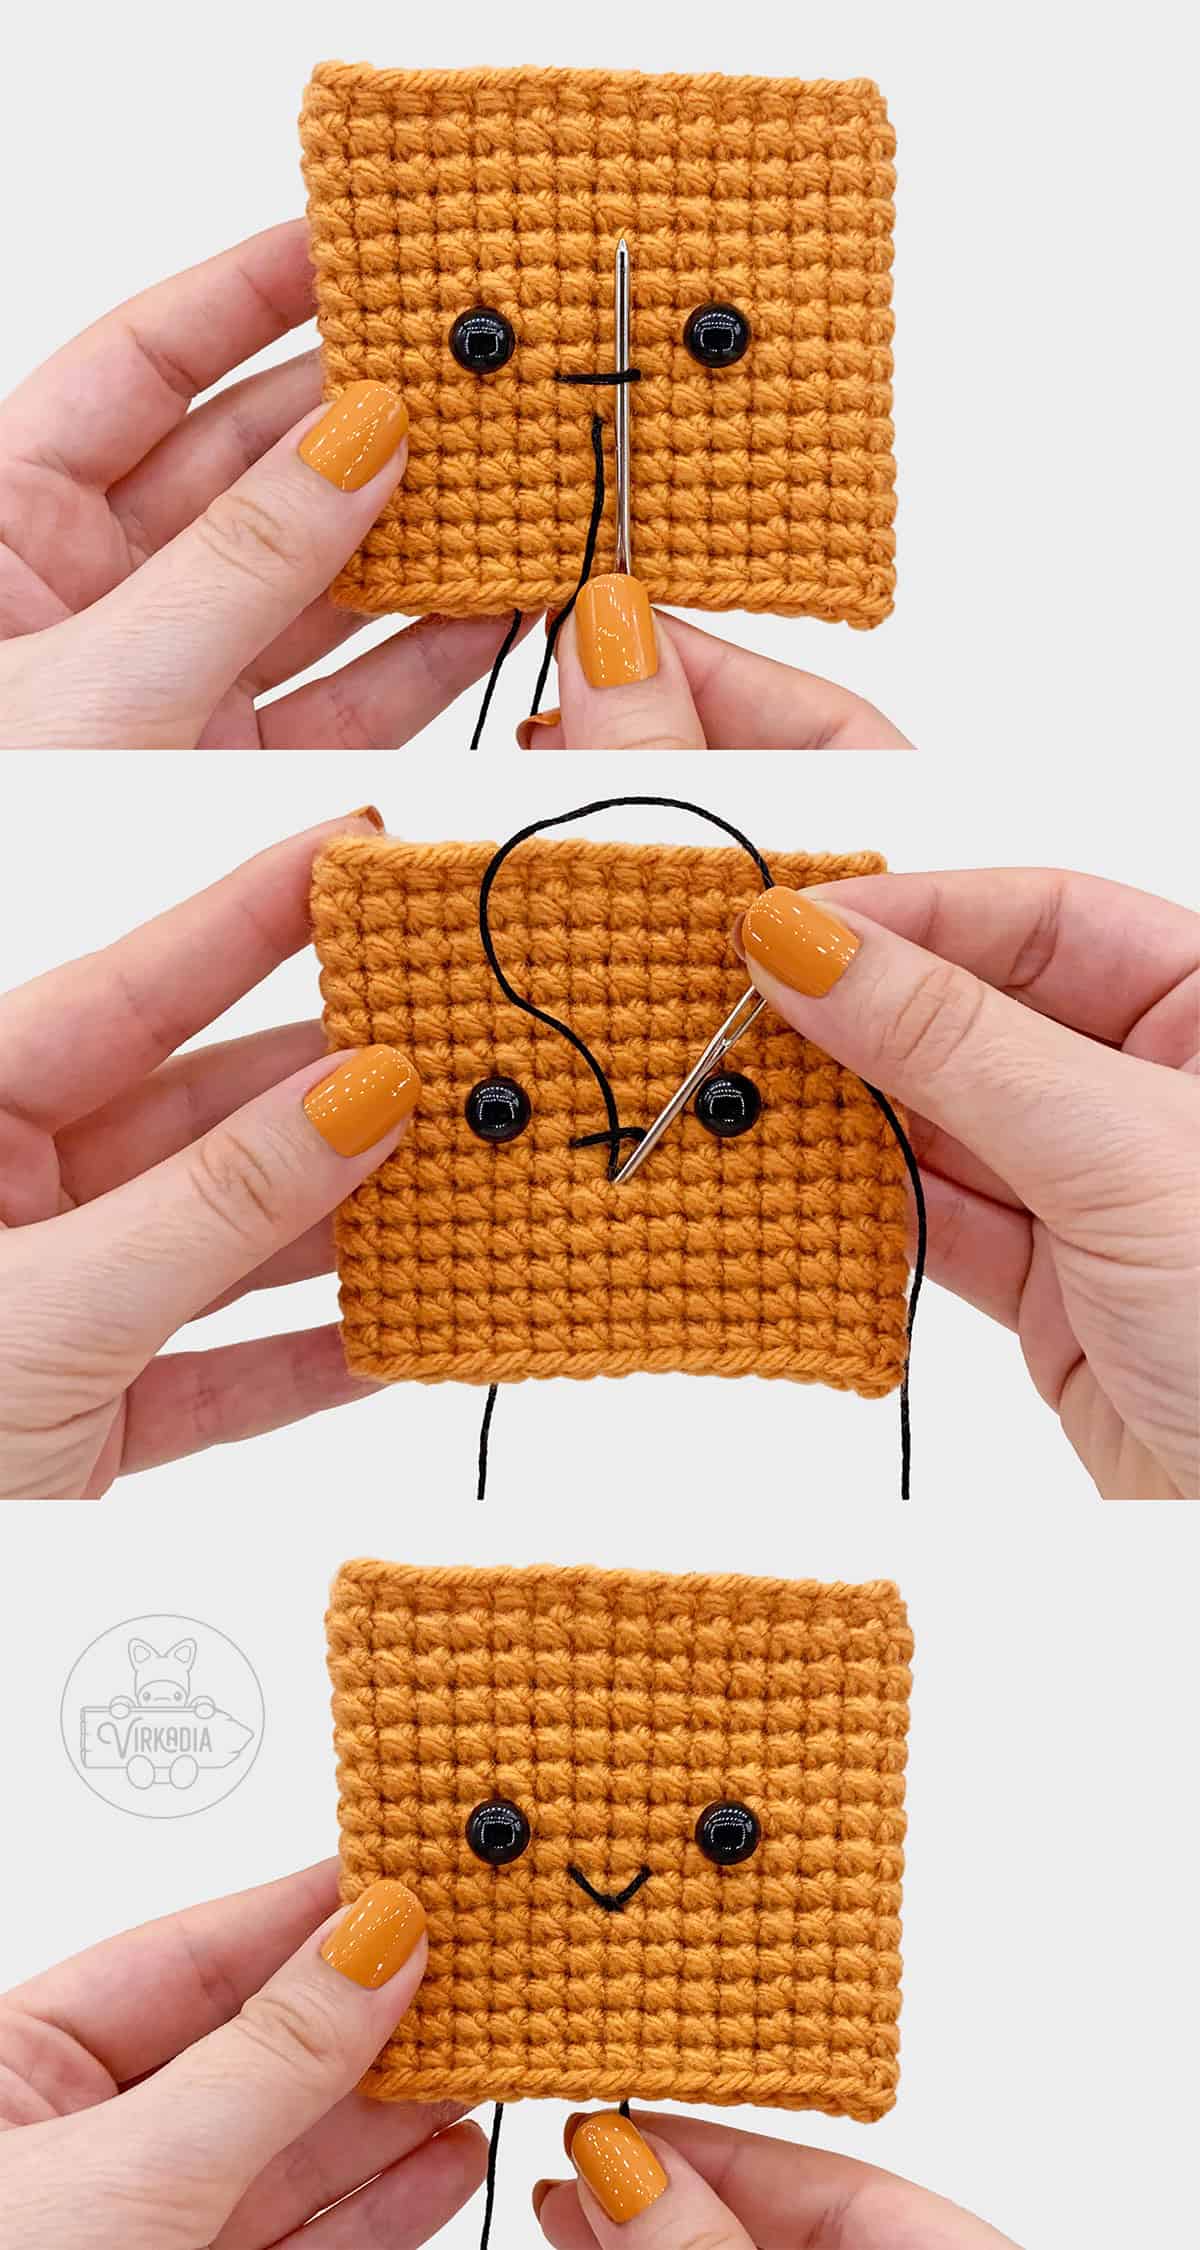
Pass your needle up and underneath the horizontal strand you’ve just created and pull through. Then, insert your needle back into the same space as you’ve last exited from.
Pull your thread through and tug it down slightly until it forms a V-shape. Gently tie both ends together inside your piece, but take extra care not to pull the threads too tight!
Adding Blush:
Using the example piece below as reference, embroider a blush line using pink embroidery floss or yarn next to each eye.
Each blush line should start 1 round down (between rounds 7 and 8) and 1 stitch outwards from where each eye was inserted, and span 1 round length outwards (away from the center of the face).
Please note, however, that because of the arching pattern of the stitches, the blush line will vary slightly from the reference images below.
Instead of embroidering 1 stitch directly outwards, you will be moving 1 round outwards and upwards, at a 45 degree angle. The blush will otherwise be embroidered the same.
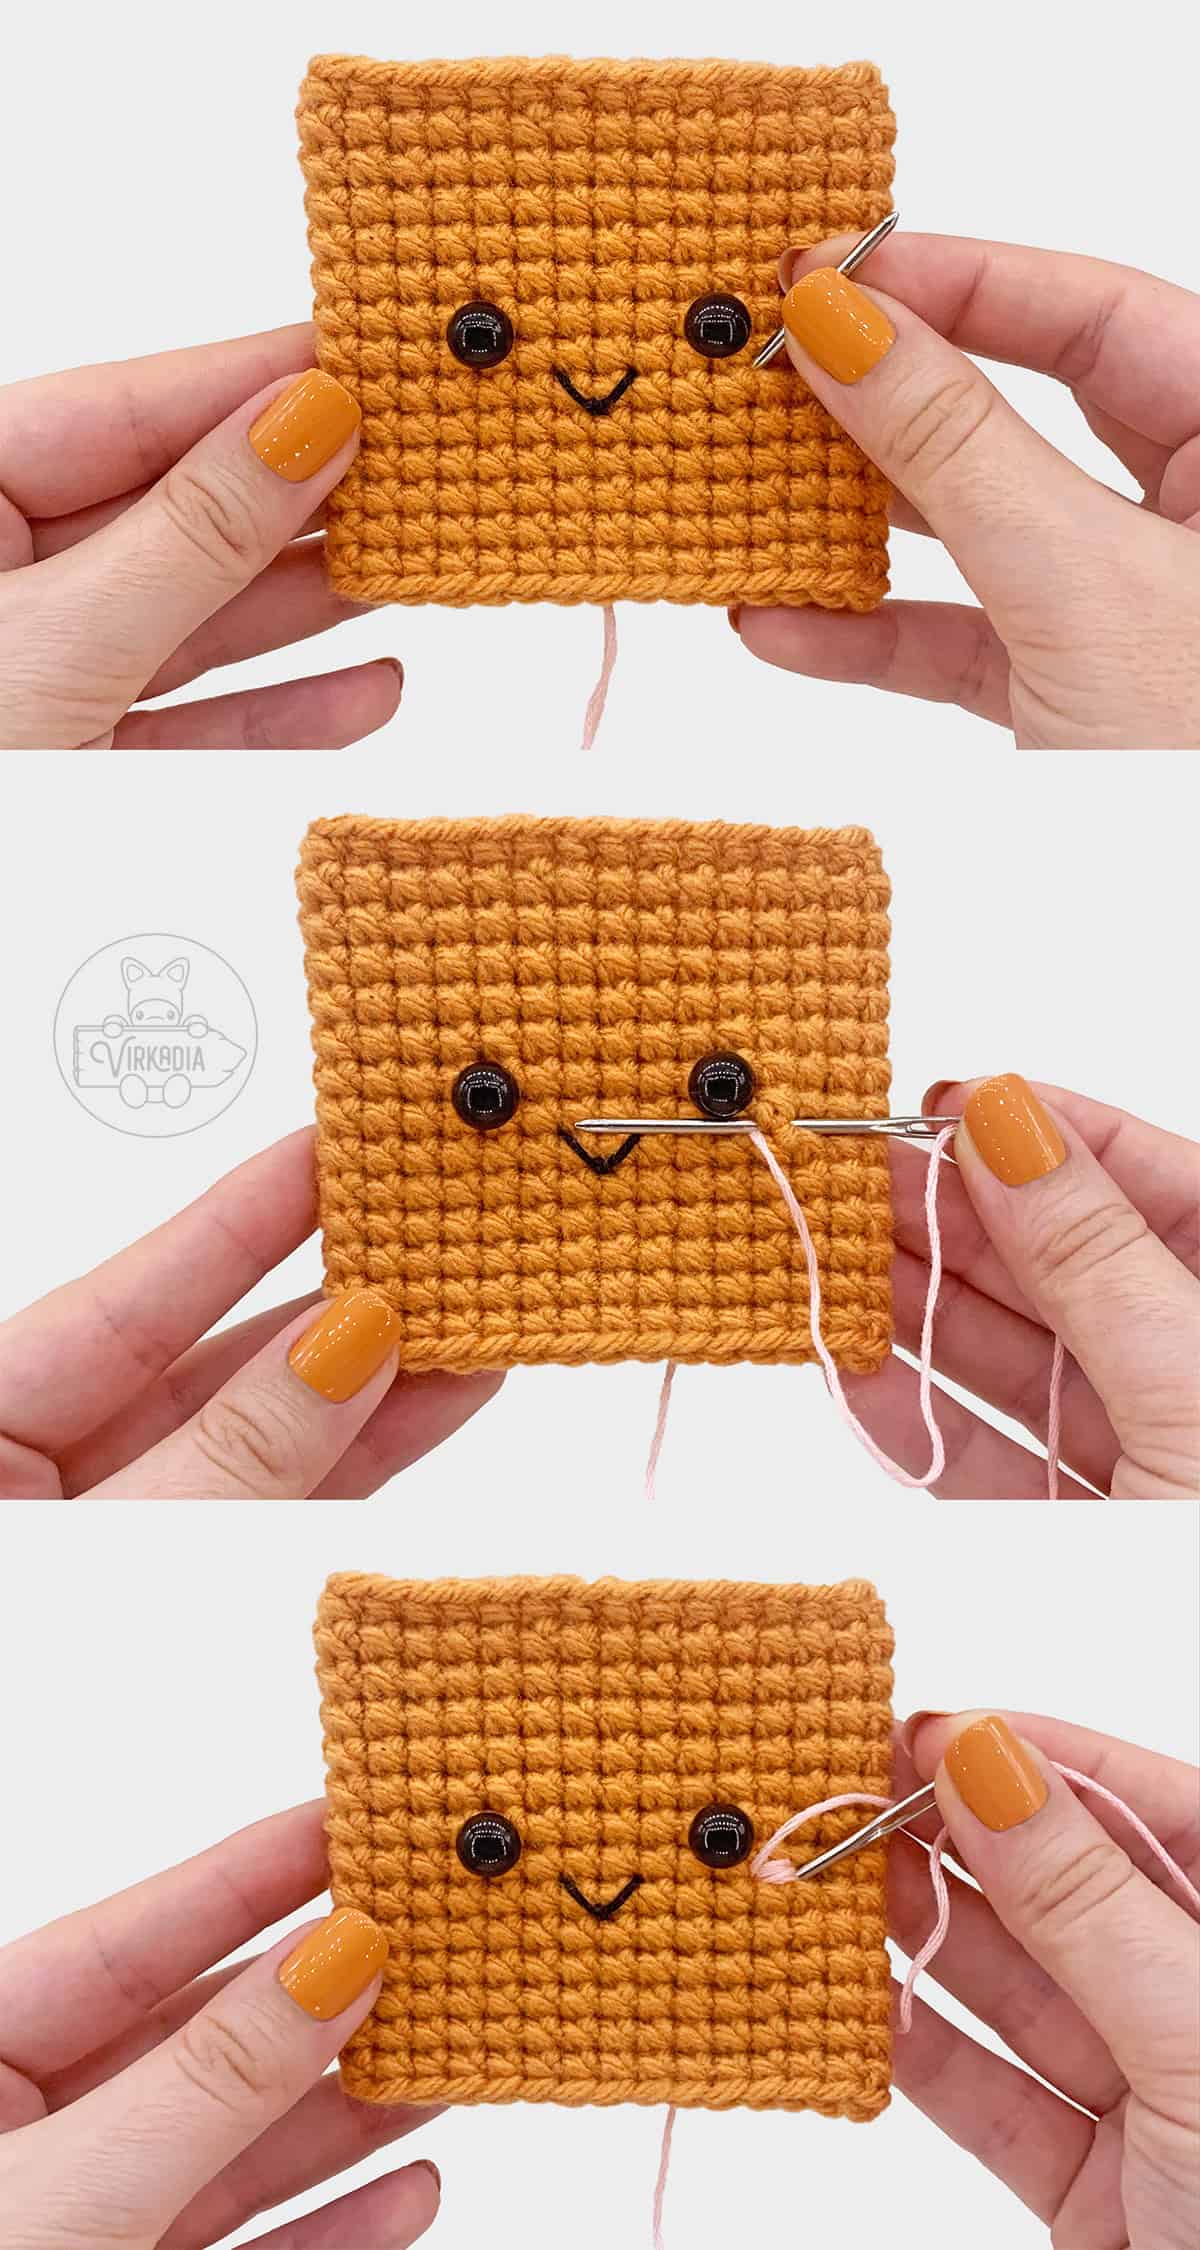
Begin by inserting your needle from inside to outside, 1 round down and 1 stitch outwards from where you’ve inserted the eye.
Pull through, leaving some tail inside for tying later. Then, insert your needle back in, 1 round outwards and slightly upwards, and pull through.
If using yarn, you may skip ahead to tying both ends together on the inside of your piece.
If using embroidery floss, pass your needle back out through the same space as you’ve last exited from and pull through. Reinsert your needle, again, 1 round outwards in the same place as before.
Repeat these last steps 3 more times, or until you are satisfied with the size of your blush. Then, gently tie both ends together on the inside of your piece.
Take extra care as you tie your ends not to pull the threads too tight! After finishing your knot, trim any excess length.
Sewing Closed:
After your face is complete, you may now sew the top seam closed, adding stuffing as you go.
To sew closed, simply squeeze the top opening together so that the two top edges of stitches are parallel and matched up along the entire length of your rainbow.
Then, take your long tail left over from fastening off of round 14 and sew each pair of stitches together across the top of the rainbow, adding stuffing every few inches.
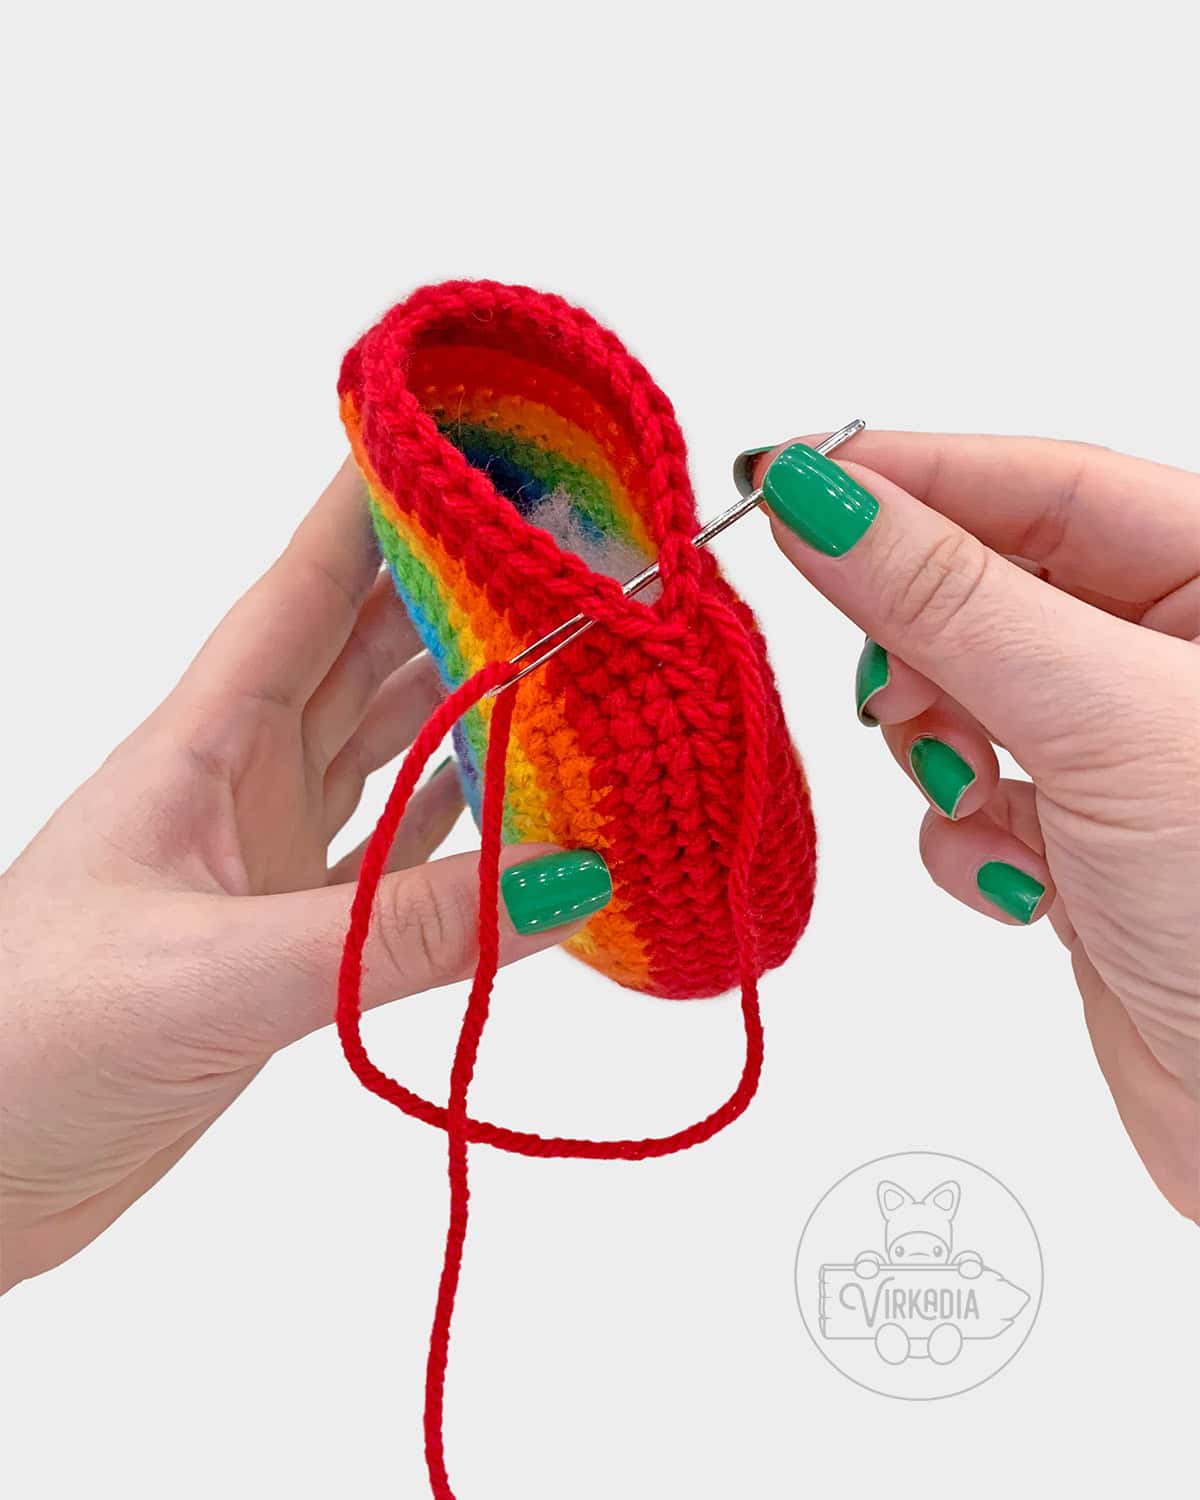
Finish off your seam by securing with a knot, trimming the tail, and weaving in any excess length.
Conclusion | Free Crochet Rainbow Amigurumi
And with that, you’re done the free crochet Rainbow Cutie pattern! If you enjoyed this pattern, be sure to check out its two companion patterns in the St. Patrick's Cuties collection: the Shamrock Cutie and the Pot of Gold Cutie!
You can also explore the Cutie Collections and the Pocket Pets archives for more original and free amigurumi patterns, or our Home Decor Patterns for other homemade household goodies!
If you’re looking to cozy up with a longer project, check out our Clothing Patterns, or assemble your own designs from one of our Granny Square Patterns!
And don’t forget to browse our downloadable, ad-free patterns in our Etsy store!
Follow Virkadia on Instagram to stay updated on all new and upcoming patterns, crochet content, and amigurumi adventures! Thank you for all of your support!

Hey hey, I'm Joey Diehl!
I am the fiber artist behind Virkadia! I have a BFA in Fibers & Material Studies and have been crocheting for over 20 years. I have designed, photographed, and written dozens of original crochet patterns that I am honored to have been shared to hundreds of thousands of readers.
Ana Carolina says
Adorable collection!!Thank you!!
Rebecca says
Thank you for sharing your cute st Patrick's patterns they are so cute. Going to do them today.