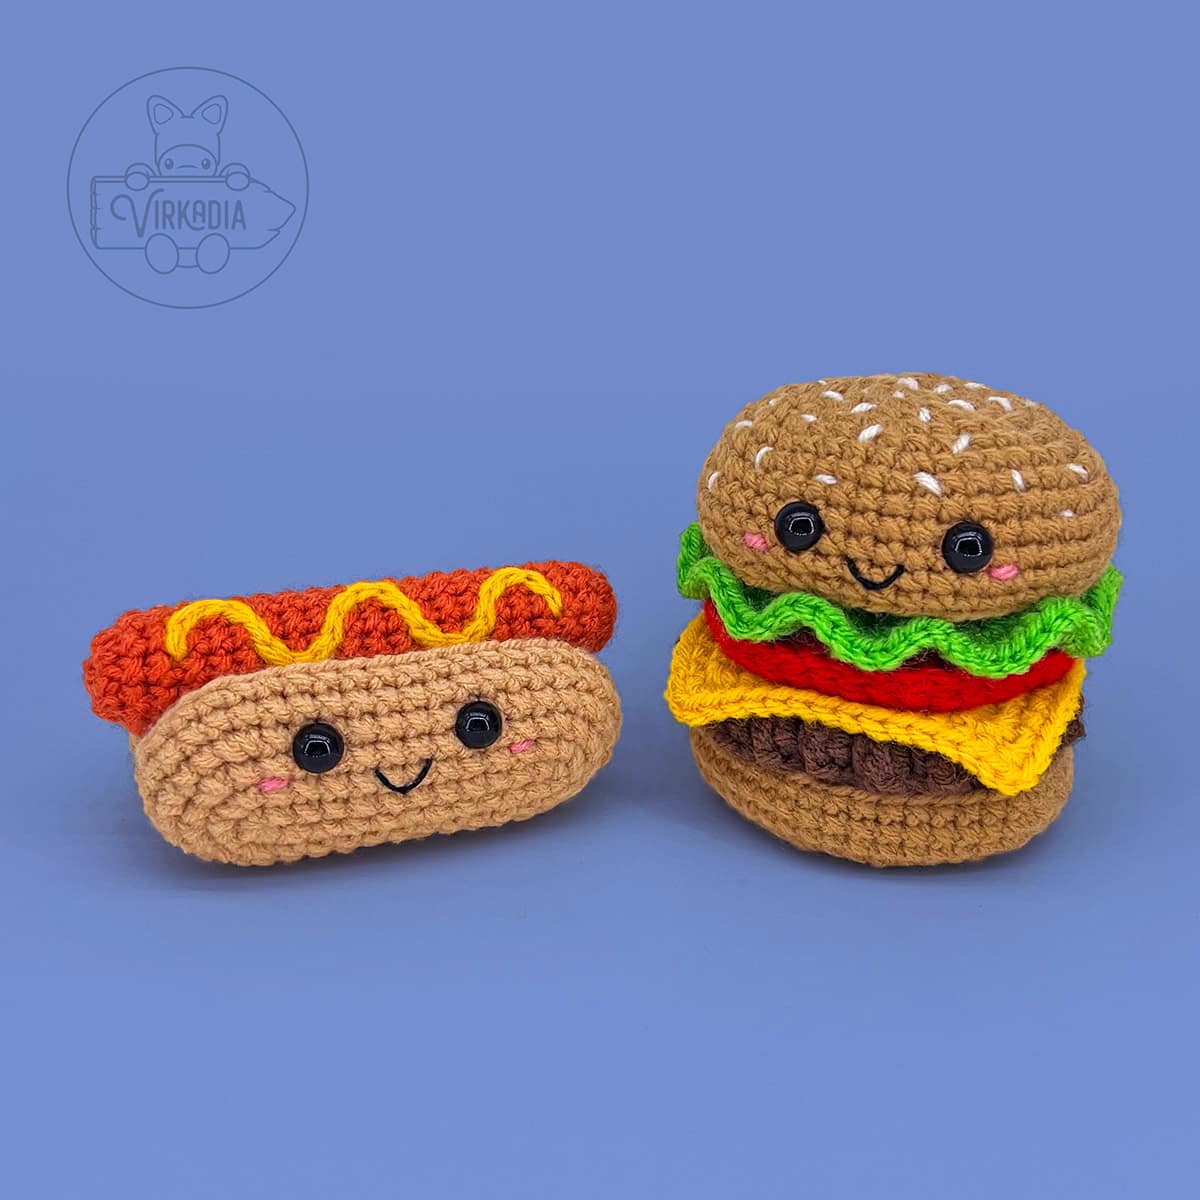
Grilled into this free crochet hot dog amigurumi pattern are all the flavorful fascinations of summer barbecues—backyards bustling with the boisterous sounds of a cookout, fresh franks hissing against the hot grates of a grill, and food requests being called out over a round of rambunctious laughter.
While you patiently wait for your food to finishing grilling, there’s no better way to soak in the summer vibes than with this free crochet hot dog amigurumi pattern!
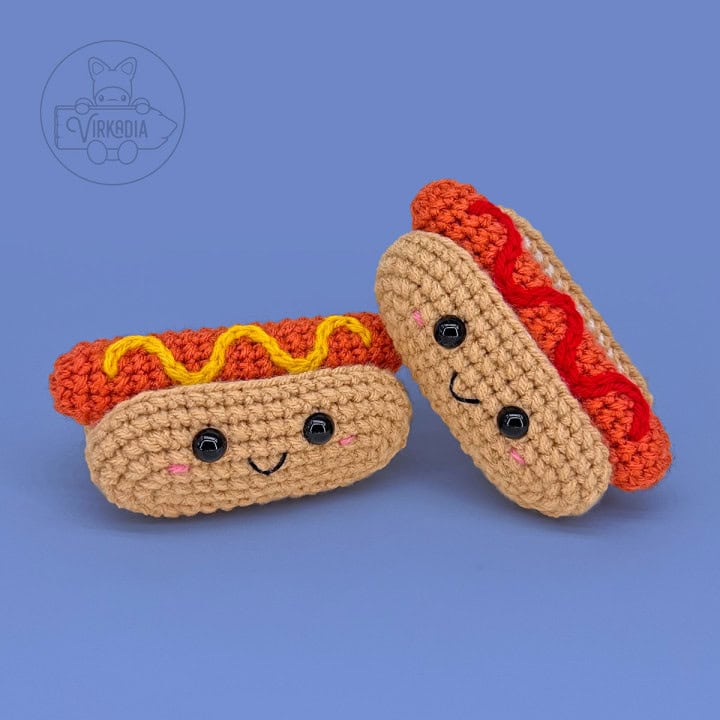
So, without further ado, here is the pattern for the Hot Dog Cutie, part 1 of 2 in the Food Cuties collection!
Pattern Information | Free Crochet Hot Dog Amigurumi
Tired of ads? Check out our ad-free PDF download, available for purchase on Etsy!
And don’t forget to add your project on Ravelry!
This free crochet hot dog amigurumi pattern has a difficulty rating of intermediate.
The finished dimensions are 2.25 inches (height) by 4.75 inches (width) by 3 inches (depth).*
You may also make your pieces larger or smaller by increasing or decreasing your yarn weight and/or hook size, respectively.
*Finished dimensions are calculated from a model using medium weight yarn, a size H-8 (5 mm) crochet hook, the YU/YO method and the following gauge: 18 sc x 21 rows = 4 inches.
Supplies:
- Size H-8 (5 mm) crochet hook
- Medium (4) weight yarn in 4 colors:
- Yarn A – orange (example uses Red Heart Super Saver: Coral)
- Yarn B – yellow (Red Heart Super Saver: Saffron)
- Yarn C – beige (Loops & Threads Soft Classic: Bisque)
- Yarn D – off-white (Red Heart Super Saver: Aran)
- 10 mm black safety eyes (x2)
- Black embroidery floss
- Pink embroidery floss or pink yarn (Red Heart Super Saver: Perfect Pink)
- Polyester fiberfill
- Yarn needle
- Scissors
- Stitch markers
Alternate Yarn Supplies:
Color Variation 2 (as seen on the right in cover photo):
- Medium (4) weight yarn in 4 colors:
- Yarn A – orange (example uses Red Heart Super Saver: Coral)
- Yarn B – red (Red Heart Super Saver: Cherry Red)
- Yarn C – beige (Loops & Threads Soft Classic: Bisque)
- Yarn D – off-white (Red Heart Super Saver: Aran)
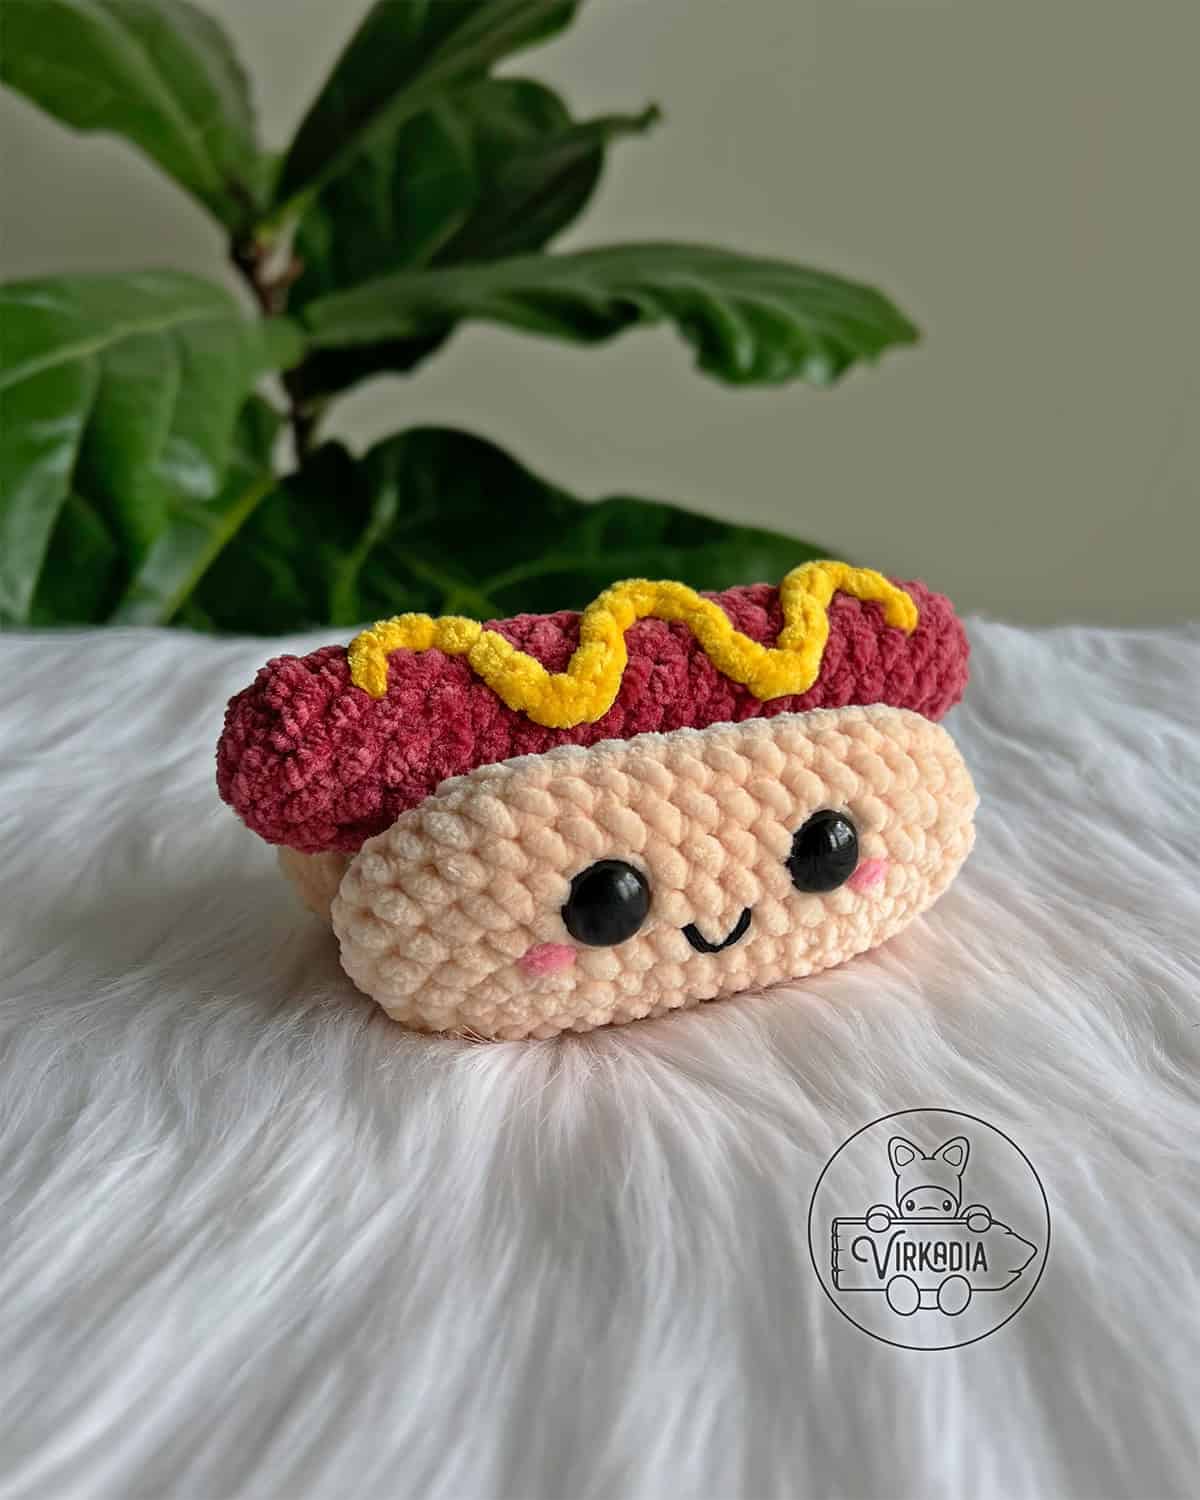
Color Variation 3 (as seen in the photo below):
The chunky example of this pattern measures 2.75 inches (height) by 5.75 inches (width) by 3.5 inches (depth) using the following gauge: 16 sc x 15 rows = 4 inches.
All supplies remain the same (including hook size), except for the following replacements:
- Super Bulky (6) weight yarn in 4 colors:
- Yarn A – dull red (Premier Parfait Chunky: Maple Leaf)
- Yarn B – yellow (Premier Parfait Chunky: Summer Squash)
- Yarn C – beige (Premier Parfait Chunky: Shell)
- Yarn D – off-white (Premier Parfait Chunky: Cream)
- 14 mm black safety eyes (x2)
- Pink yarn (Premier Parfait Chunky: Pink Lemonade)
- Black embroidery floss (doubled)
Terminology:
This free crochet hot dog amigurumi pattern uses English (US) terminology:
- st (sts) = stitch (stitches)
- ch = chain stitch
- sl st = slip stitch
- sc = single crochet
- sc2tog = single crochet 2 together (over the span of 2 stitches), also known as a decrease
- sc3tog = single crochet 3 together (over the span of 3 stitches)
- sk = skip
- rep = repeat
- BLO = back loop only
Please note that this pattern is written so that each crochet stitch abbreviation is attached to a number, such as 1sc, 2sc, etc. This number denotes how many of that stitch is to be worked into the same stitch.
You can learn more about how to read Virkadia patterns on our Pattern Help FAQ page!
Special Stitch Instructions:
Please review our special stitch instructions on our Stitch Tutorials FAQ page before beginning, as some techniques may be unique to this pattern.
You can also watch our amigurumi techniques video tutorial for all of our tips and tricks for improving your project!
This free crochet hot dog amigurumi pattern uses the following special stitch tutorials:
- Single Crochet (YU/YO Method)
- Invisible Decrease
- Joining Rounds
This pattern is worked in the round, with each round joined at the end with a slip stitch. Unless otherwise instructed, the first stitch of your next round will always be worked into the same stitch as your joining slip stitch has been worked into.
Be sure to always keep the ‘right side’ of your stitches facing outwards as you work. The right side is the front side of the stitch that is facing you as you are completing each stitch.
Pattern Instructions | Free Crochet Hot Dog Amigurumi
Tired of ads? Check out our ad-free PDF download, available for purchase on Etsy!
And don’t forget to add your project on Ravelry!
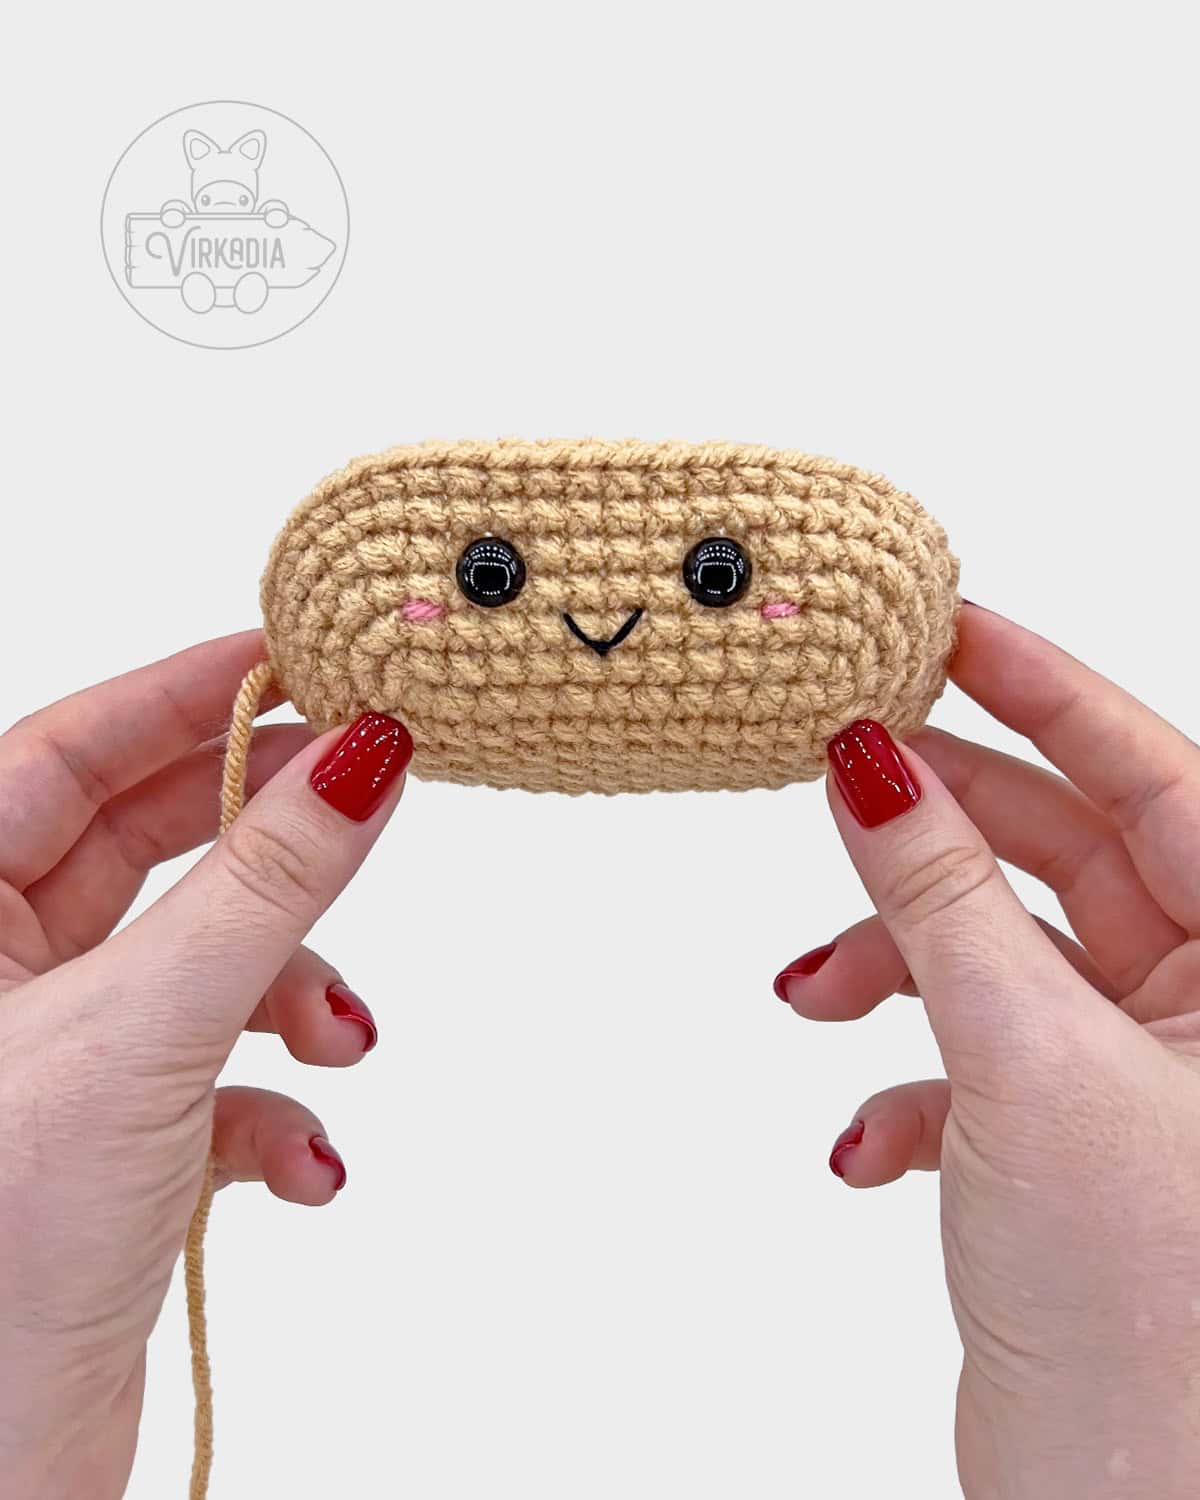
Crochet Hot Dog – Rounds 1 to 5:
With yarn A (orange), make a magic ring (or ch 2, work rnd 1 into 2nd ch from hook).
Rnd 1: 6sc into ring, sl st into 1st st to join, ch 1 (6).
Rnd 2: 2sc into each st around, join, ch 1 (12).
Rnd 3: 1sc into each st around, join, ch 1 (12).
Rnd 4: 1sc into each st around, join, ch 1 (12).
Rnd 5: 1sc into each st around, join, ch 1 (12).
Before continuing to round 6, be sure to review the instructions for adding the mustard embellishment in the next section below.
The following method that is used for adding the mustard will be easier for some crocheters if it is worked in tandem with the remaining rounds of your crochet hot dog.
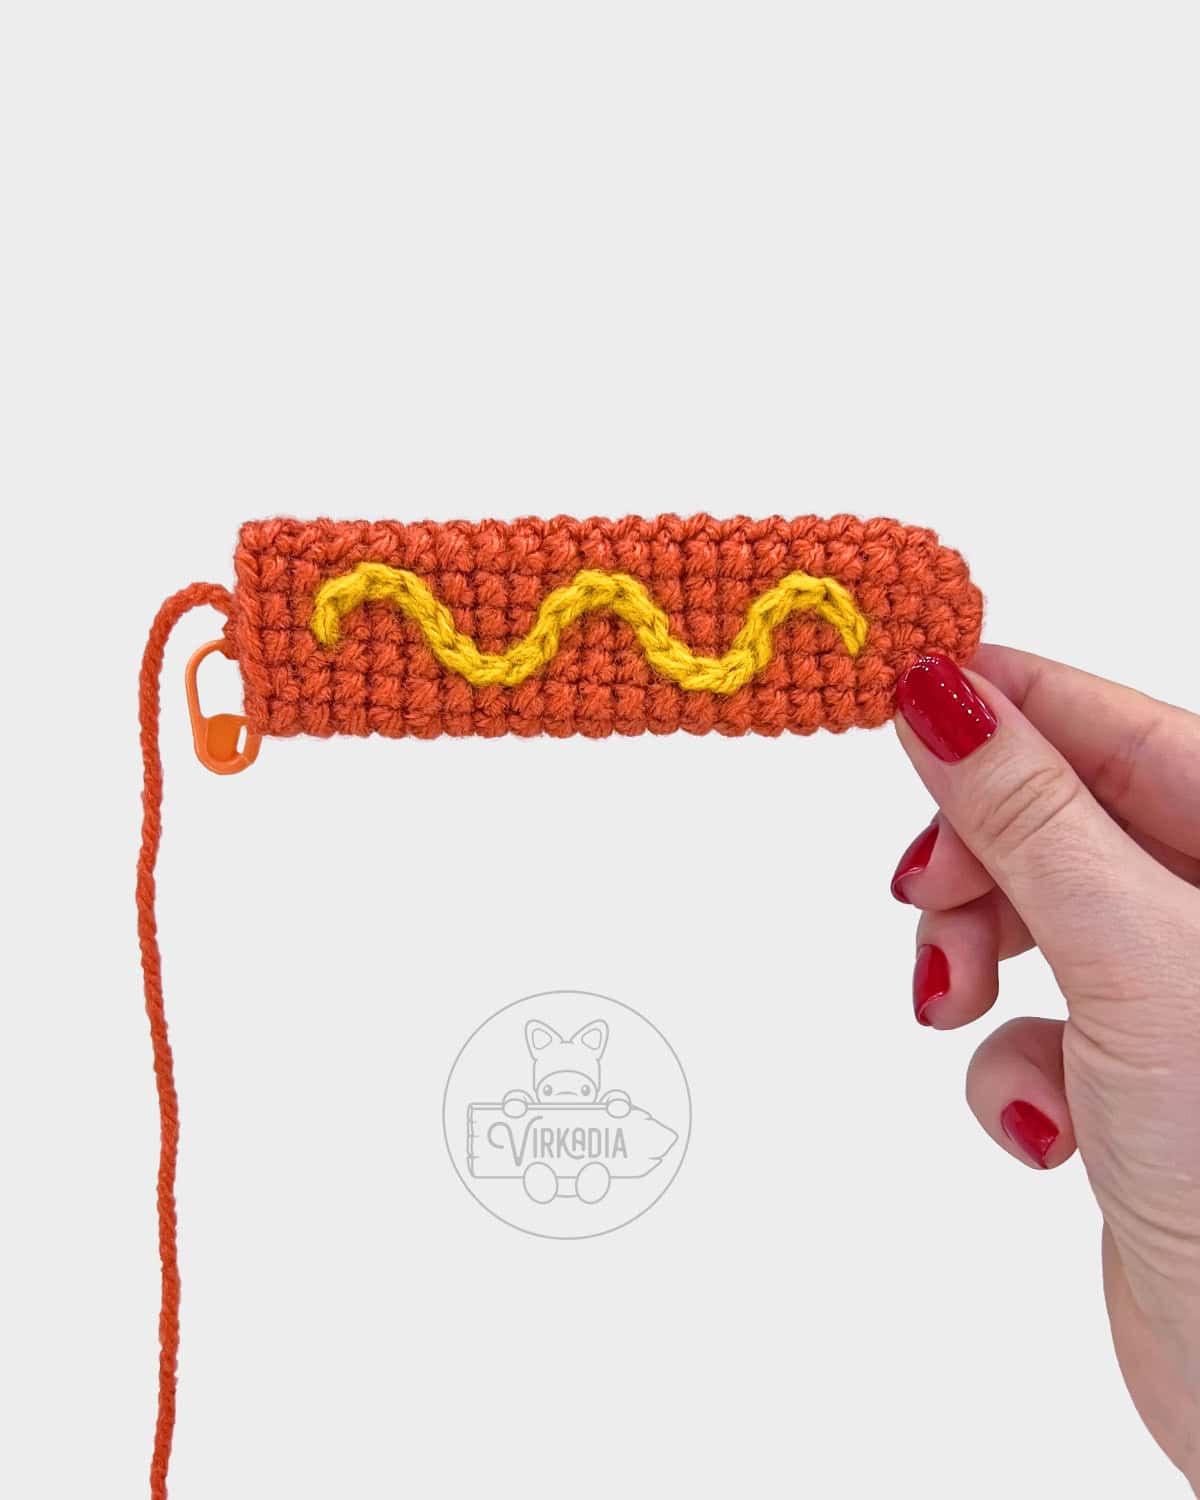
Adding Mustard:
To create the mustard embellishment, you will be using a surface crochet technique to add slip stitches across the top surface of your crochet hot dog.
Since you will be pulling the yarn for your slip stitches from the inside of your hot dog to complete each stitch, it is recommended to work this method as you go, rather than at the end.
However, you may also choose to complete your crochet hot dog up until round 21 first, before adding your mustard embellishment, as seen in the tutorial below.
Choose whichever method works best for you!

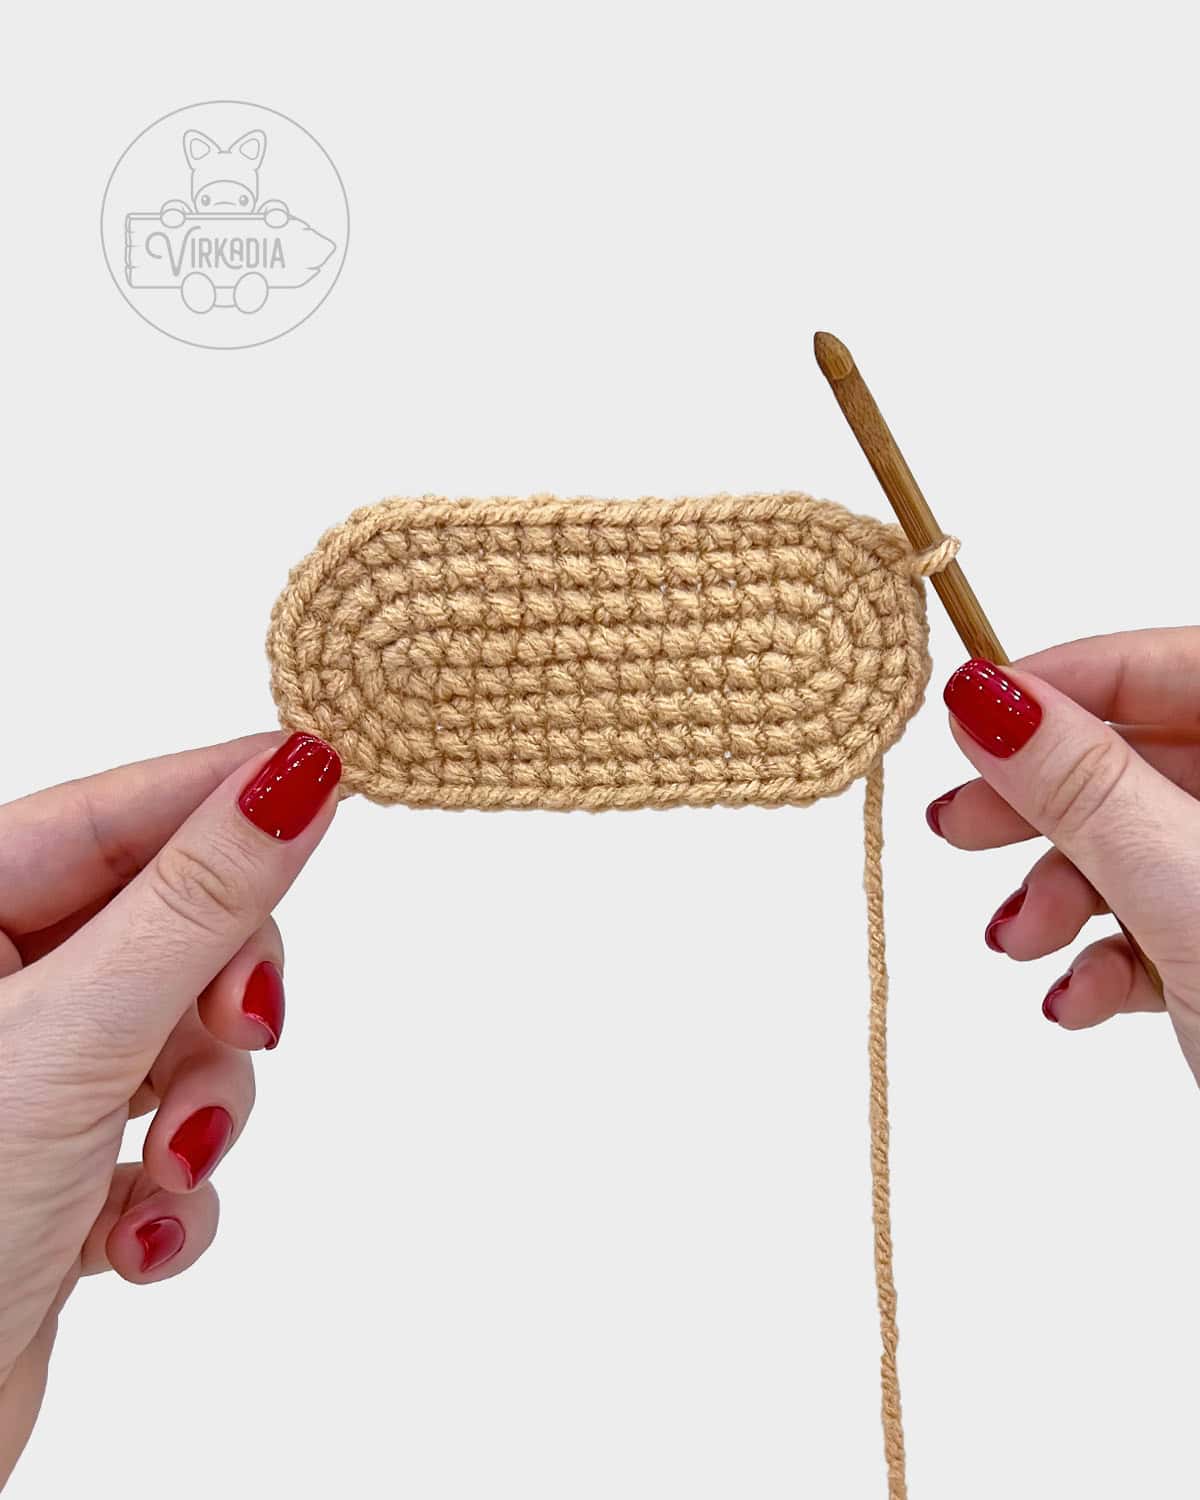
Begin by rotating your hot dog so that it is horizontal, as seen above.
Next, insert your hook through the surface of your piece, from outside to inside, anywhere between rounds 4 and 5.
For best results, begin your mustard surface crochet on the opposite side from your joining seam.
With yarn B (yellow), yarn over on the inside of your piece and pull a loop through the surface of your crochet hot dog.
You should now have a loop on the outside surface of your piece, while both tails (beginning tail and working yarn) remain on the inside.
Secure your beginning tail on the inside of your piece by tying a knot with the working tail, or by tying it directly onto the interior surface of your hot dog.
Then, cut any excess beginning tail. As you work your surface crochet slip stitches, allow your working tail to remain on the inside of your hot dog.
Once you have your starting loop ready, insert your hook again, 1 stitch higher, but still remaining between rounds 4 and 5.
Yarn over on the inside of your piece and pull a new loop through the surface of your hot dog, as well as the loop on your hook, to complete your first surface crochet slip stitch.
If you are adding your mustard as you go, secure your working loop of yarn B with a stitch marker and work a few more rounds of your hot dog before continuing. Otherwise, continue to your second slip stitch.
Follow the outline above to complete your remaining slip stitches across the surface of your hot dog. For example, the second slip stitch will be worked into the space 1 stitch higher and 1 round over, in the direction of your most recently worked round.
If you are adding the mustard as you go, you may also stuff as you go. However, if you are adding the mustard last, do not add any stuffing until your mustard is complete!
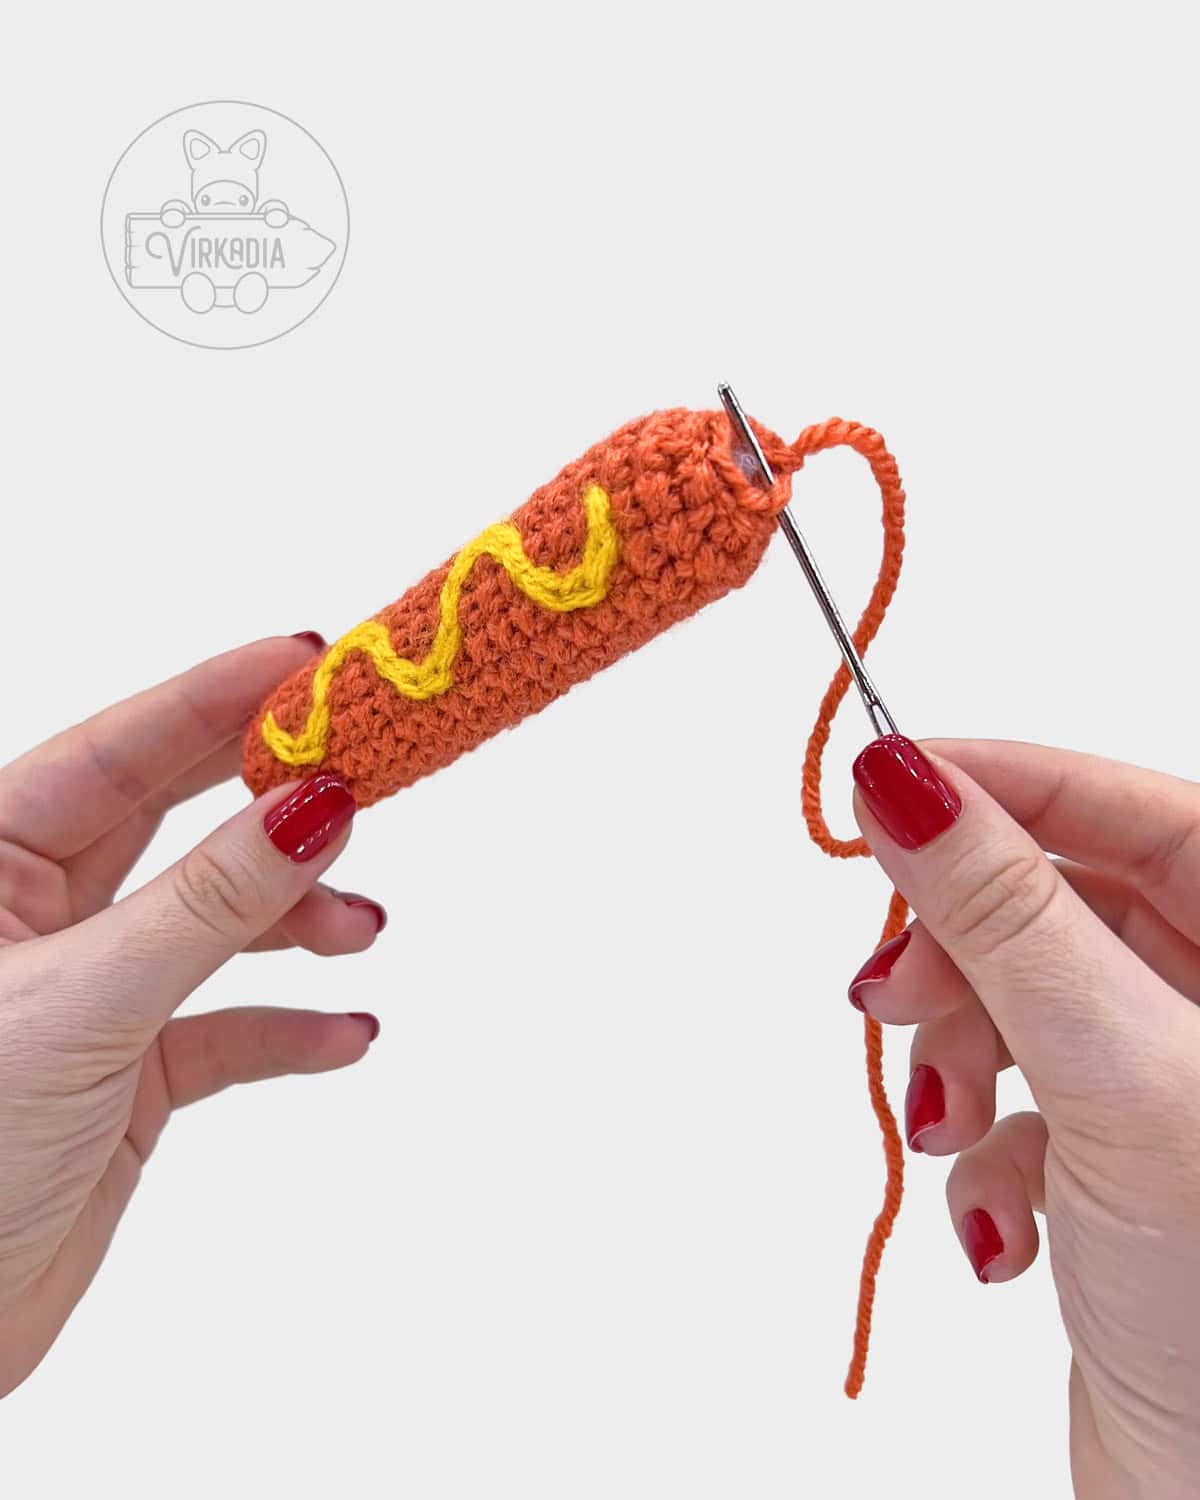
Once you reach the end of the mustard design, cut your working yarn and pull your end tail completely through your last slip stitch and onto the front of your piece.
Then, sew your tail back down into your hot dog through a nearby space. Take care not to reinsert into the same space, or else your slip stitch will unravel!
Secure your sewing with a knot onto the interior of your hot dog and cut any excess tail. You may then stuff your hot dog if you have not done so already.
Crochet Hot Dog – Rounds 6 to 22:
Rnd 6: 1sc into each st around, join, ch 1 (12).
Rnds 7 to 21 (15 rnds): rep rnd 6 (12).
At this point, your mustard embellishment should be complete and your hot dog should be fully stuffed before continuing to round 22.
Rnd 22: [sc2tog over next 2 sts] 6 times, join (6).
Fasten off and leave a tail for sewing closed.
Sewing Closed:
To sew the top hole closed, pass the needle, from front to back, through the front loop only of each stitch around and then pull tight.
Secure your sewing with a knot, trim the tail, and sew in any remaining length.
Set your crochet hot dog aside for now and continue to round 1 of the hot dog bun below.
Crochet Hot Dog Bun – Rounds 1 to 6:
With yarn C (beige), chain 13.
Rnd 1: beginning in 2nd ch from hook, *1sc into each of next 11 sts, 2sc into next st,* working into other side of ch sts, rep from * to * 1 time, sl st into 1st st to join, ch 1 (26).
Rnd 2: [2sc into next st, 1sc into each of next 10 sts, 2sc into each of next 2 sts] 2 times, join, ch 1 (32).
Rnd 3: [1sc into next st, 2sc into next st, 1sc into each of next 11 sts, 2sc into next st, 1sc into next st, 2sc into next st] 2 times, join, ch 1 (38).
Rnd 4: [2sc into next st, 1sc into each of next 12 sts, 2sc into next st, 1sc into each of next 2 sts, 2sc into next st, 1sc into each of next 2 sts] 2 times, join, ch 1 (44).
Rnd 5: 1sc into each st around, join, ch 1 (44).
Rnd 6: 1sc into each st around, join (44).
Fasten off and leave a short tail for tying. Then, follow the instructions for adding the eyes, mouth, and blush before continuing to round 7 of your crochet hot dog bun.
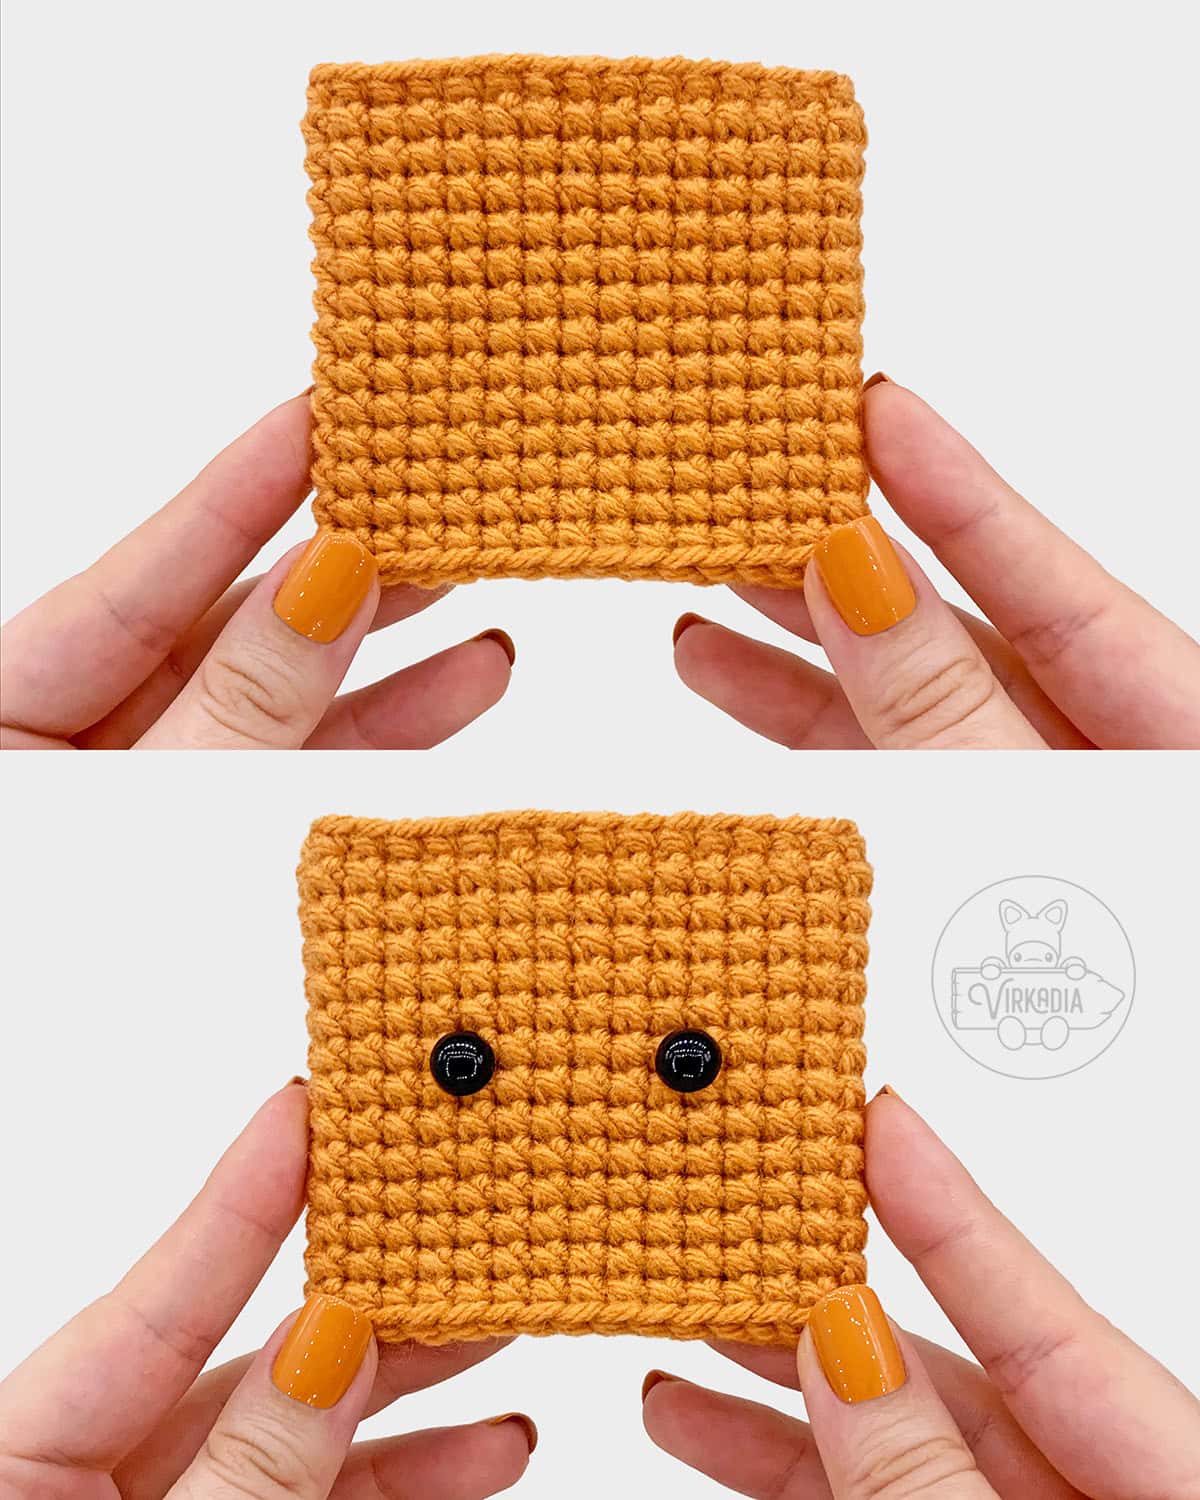
Adding Eyes:
Rotate your hot dog bun so that it is horizontal, with your joining seam angled towards the bottom.
Using the example piece below as reference, insert both safety eyes through the top front of your piece between rounds 3 and 4, or between the 3rd and 4th rounds down from the top edge of the bun.
The eyes should be centered in the middle of the top half of the bun, and should sit 6 stitches apart, from the center of one eye to the center of the other.
Adding Mouth:
Using the example piece below as reference, embroider a mouth using black embroidery floss.
The mouth should be embroidered over top of round 2 and be centered between the eyes. The mouth will be 2 stitches wide and 1 round tall.
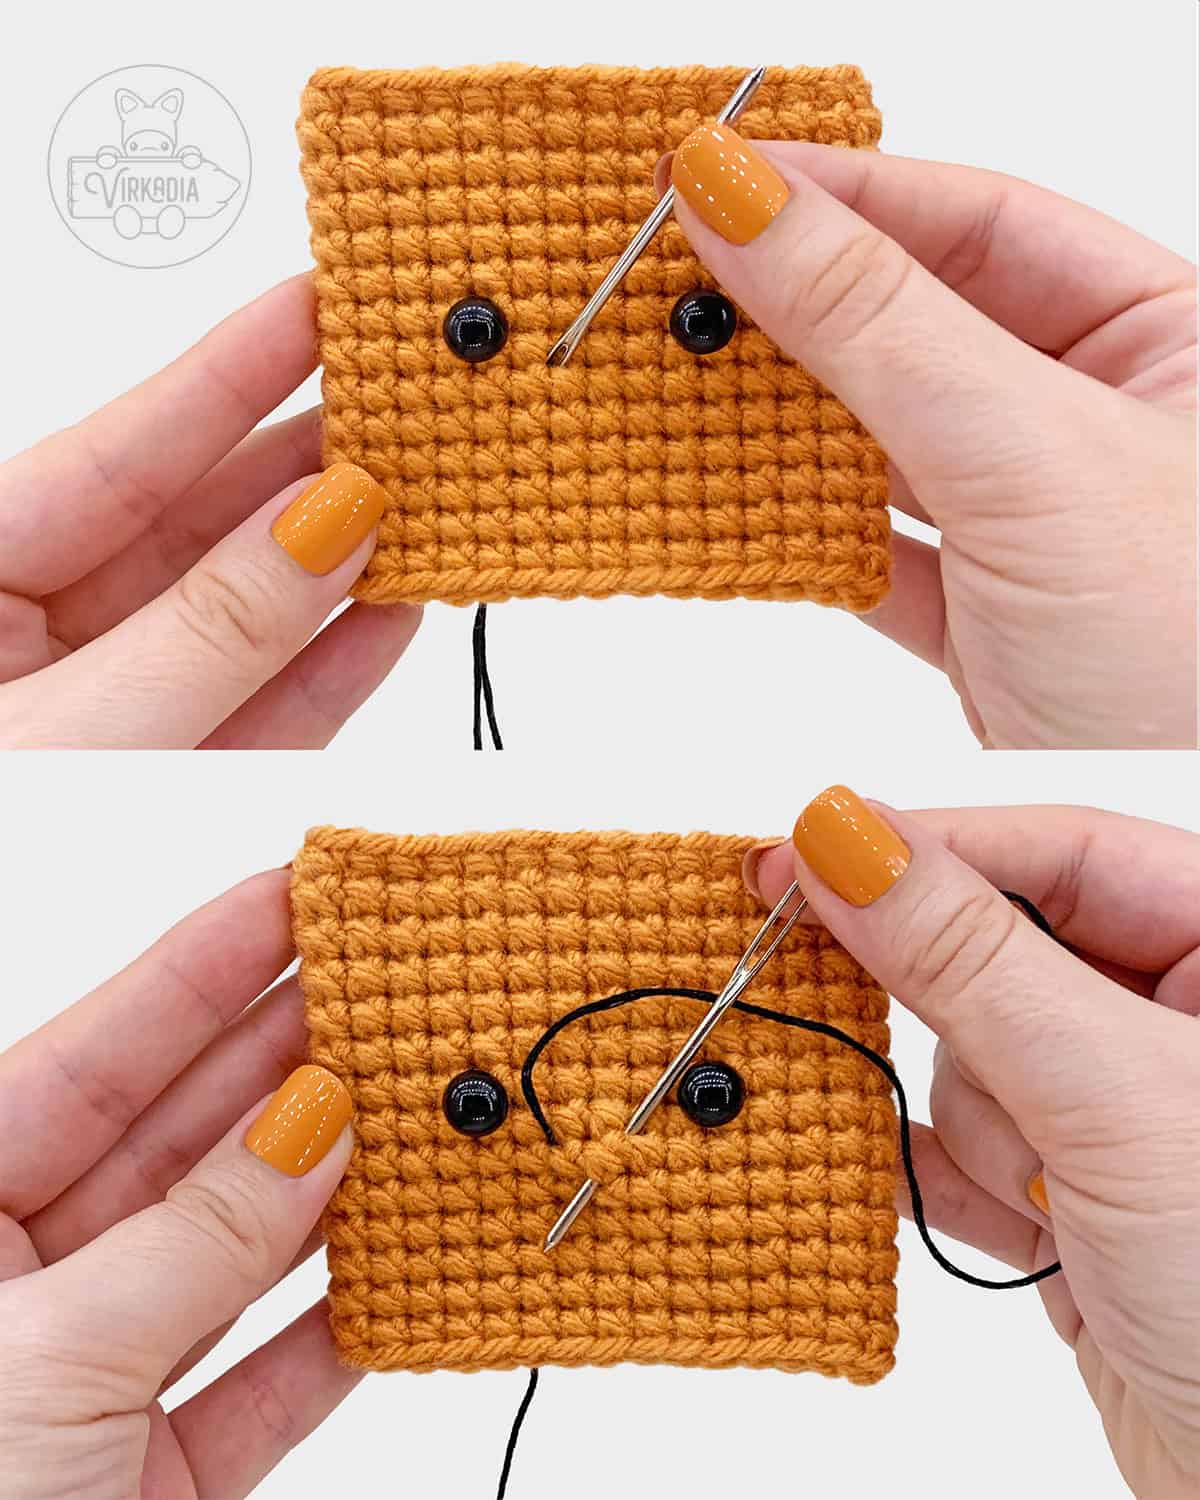
Begin by inserting your needle from inside to outside, 1 round down and 2 stitches to the right from where you've inserted the left eye. Pull through and leave some tail for tying later.
Then, insert your needle again, 2 stitches to the right, and out again, 1 round down and 1 stitch to the left from where you've just inserted, and pull through.
Pass your needle up and underneath the horizontal strand you’ve just created and pull through. Then, insert your needle back into the same space as you've last exited from.
Pull your thread through and tug it down slightly until it forms a V-shape. Gently tie both ends together inside your piece.
Take extra care as you tie your ends not to pull the threads too tight! After finishing your knot, trim any excess length.
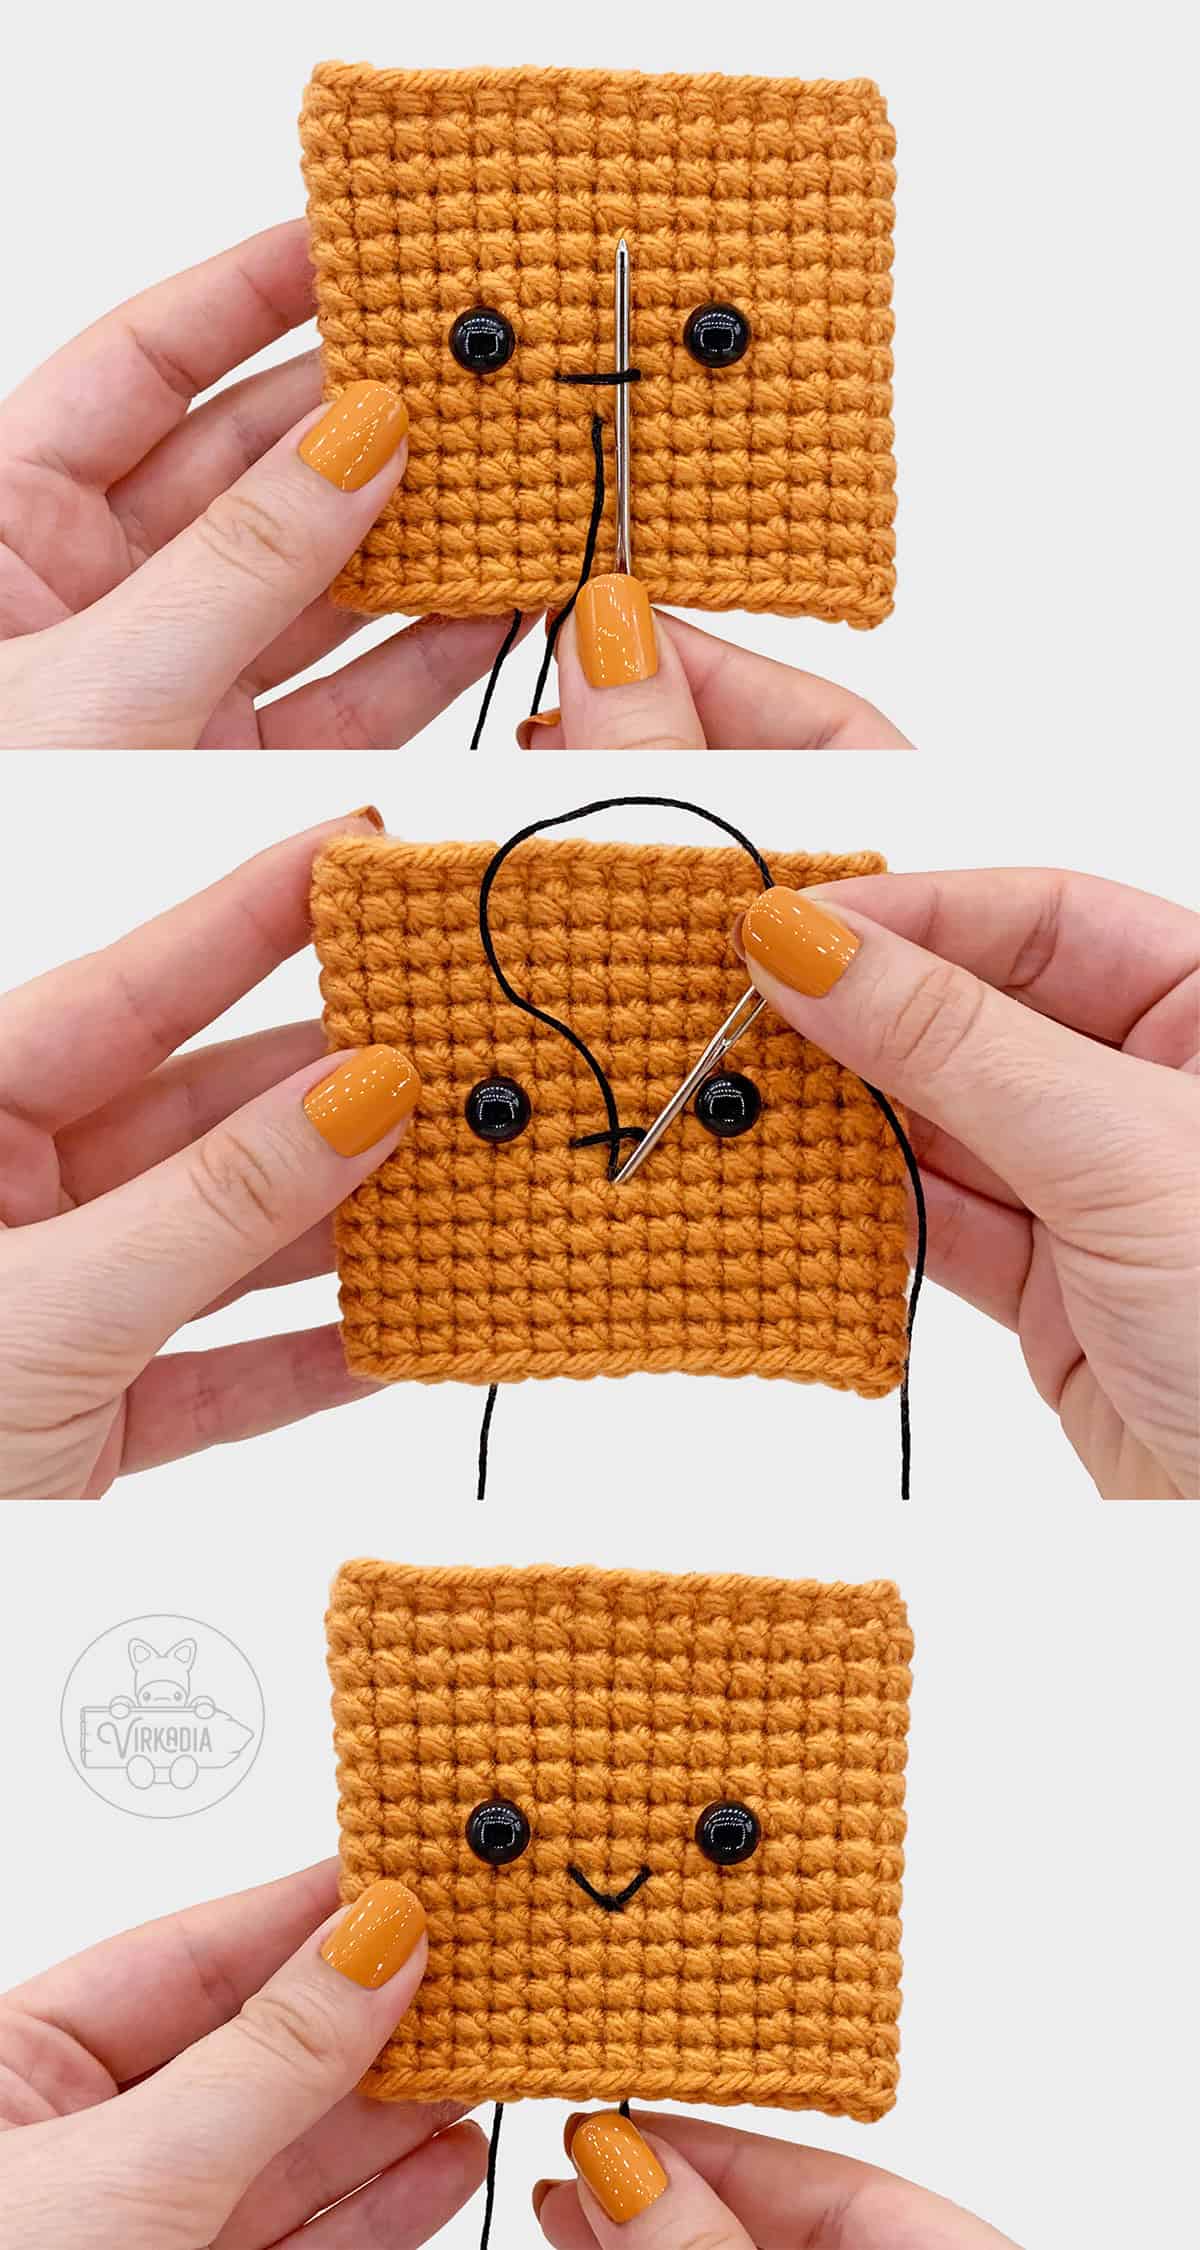
Adding Blush:
Using the example piece below as reference, embroider a blush line using pink embroidery floss or yarn next to each eye.
Each blush line should start 1 round down (between rounds 2 and 3) and 1 stitch outwards from where each eye was inserted, and span 1 stitch length outwards (away from the center of the face).
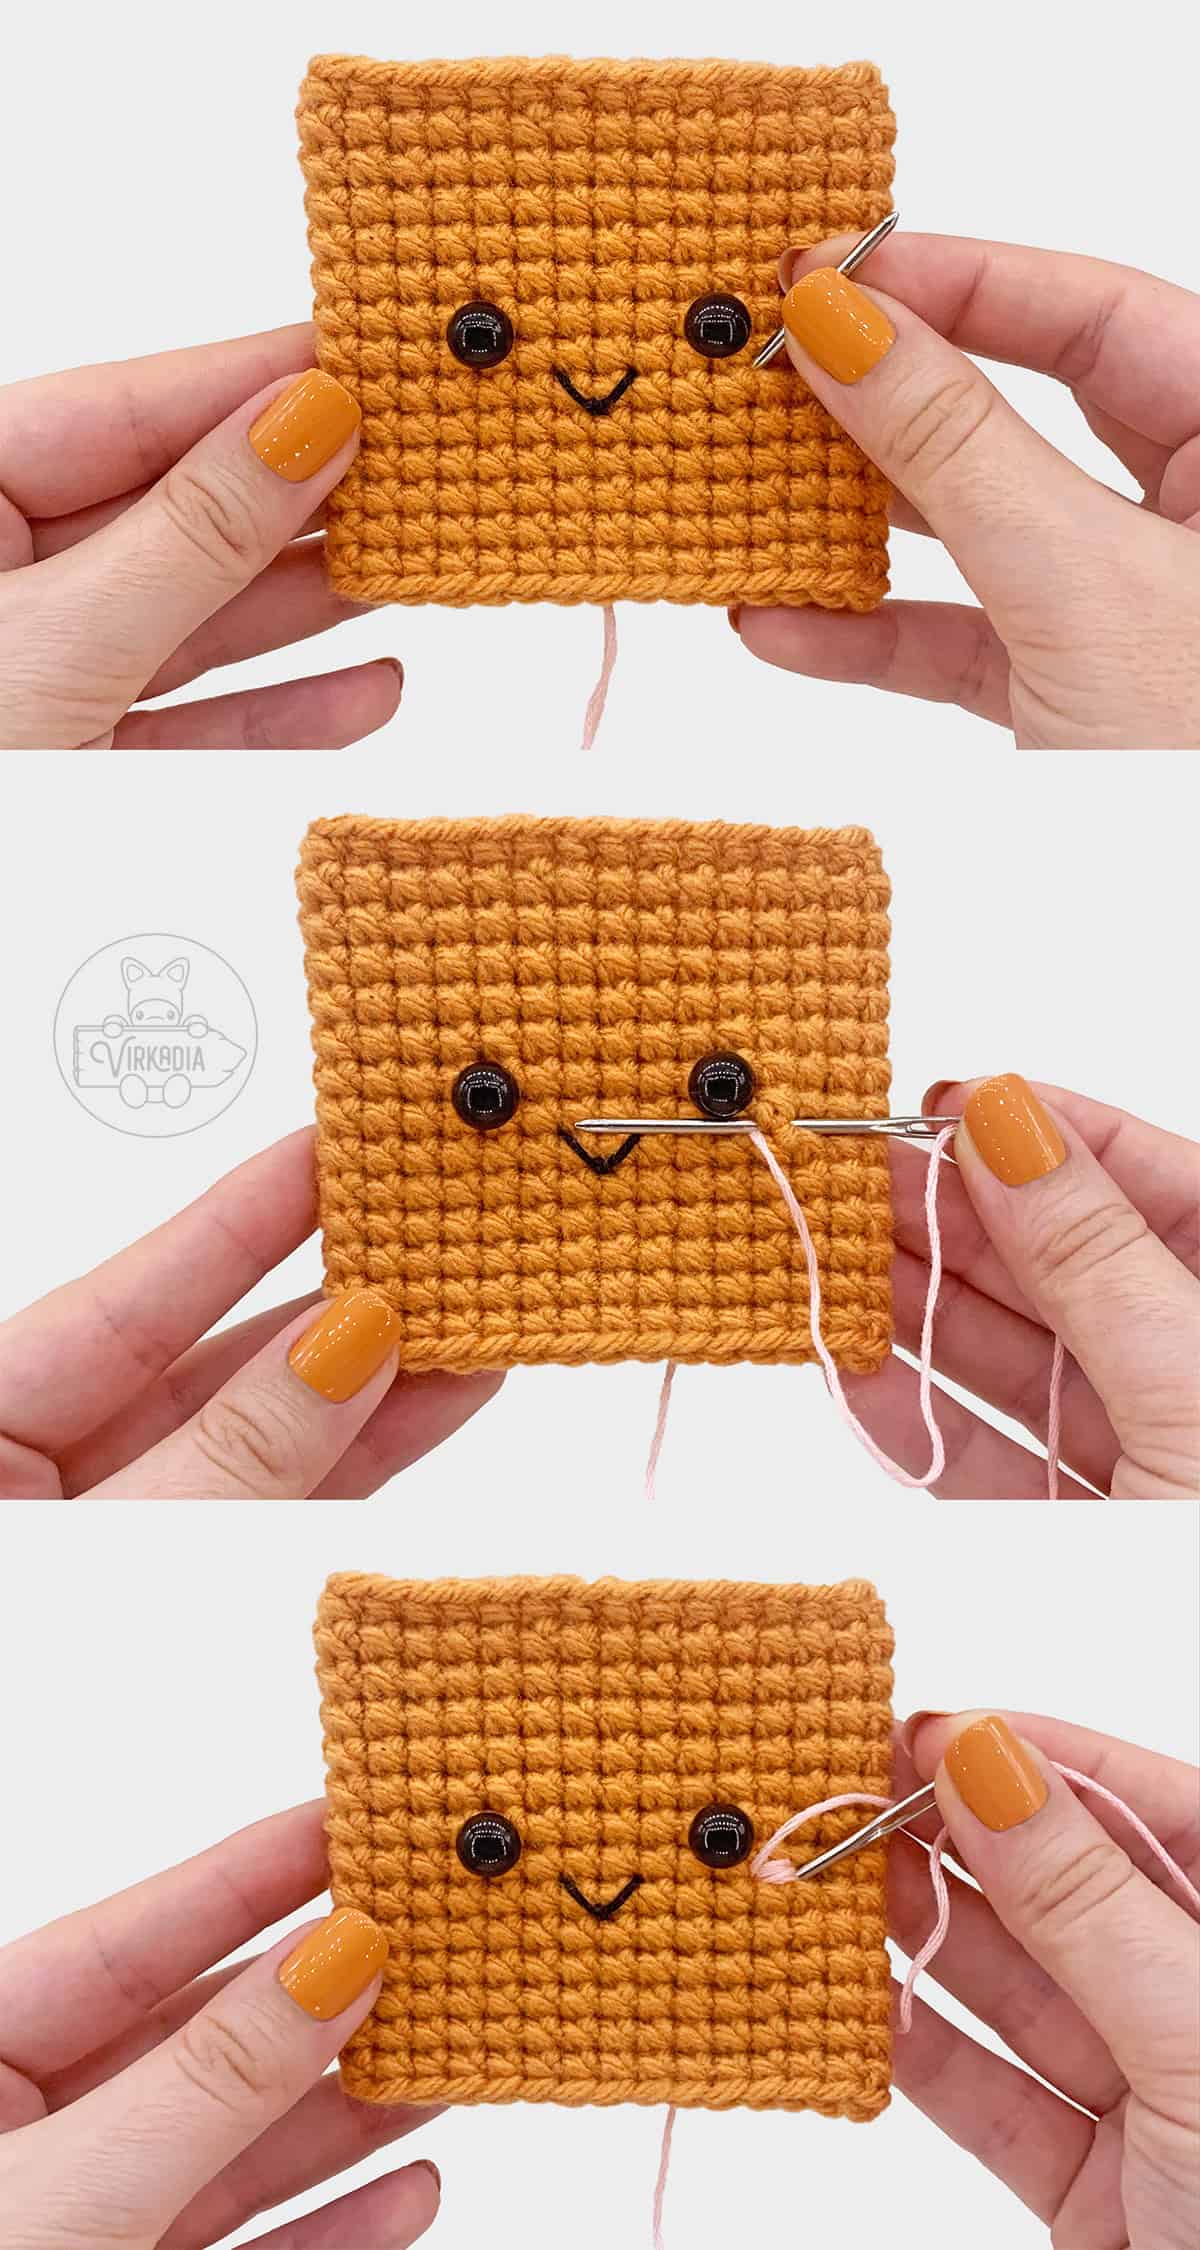
Begin by inserting your needle from inside to outside, 1 round down and 1 stitch outwards from where you’ve inserted the eye.
Pull through, leaving some tail inside for tying later. Then, insert your needle back in, 1 more stitch outwards.
If using yarn, you may skip ahead to tying both ends together on the inside of your piece.
If using embroidery floss, pass your needle back out through the same space as you’ve last exited from and pull through. Reinsert your needle, again, 1 stitch outwards in the same place as before.
Repeat these last steps 3 more times, or until you are satisfied with the size of your blush. Then, gently tie both ends together on the inside of your piece.
Take extra care as you tie your ends not to pull the threads too tight! After finishing your knot, trim any excess length.
Crochet Hot Dog Bun – Rounds 7 to 10:
Continue to the next round and begin stuffing as you go. However, take care not to overstuff your piece!
Join yarn D (off-white) by inserting your hook into the back loop only of the first stitch from round 6. Pull up a loop of yarn D and chain 1.
Tie the tails of both yarn C and yarn D together on the interior of your piece to secure your ends.
Rnd 7: in BLO of each st around, [sc2tog over next 2 sts, 1sc into each of next 12 sts, sc2tog over next 2 sts, 1sc into each of next 2 sts, sc2tog over next 2 sts, 1sc into each of next 2 sts] 2 times, join, ch 1 (38).
Rnd 8: [1sc into next st, sc2tog over next 2 sts, 1sc into each of next 11 sts, sc2tog over next 2 sts, 1sc into next st, sc2tog over next 2 sts] 2 times, join, ch 1 (32).
Rnd 9: [sc2tog over next 2 sts, 1sc into each of next 10 sts, sc2tog over next 2 sts, sc2tog over next 2 sts] 2 times, join, ch 1 (26).
Rnd 10: sk next st, 1sc into each of next 10 sts, sc3tog over next 3 sts, 1sc into each of next 10 sts, sc2tog over next 2 sts, join (22).
Fasten off and leave a tail for sewing closed.
Sewing Closed:
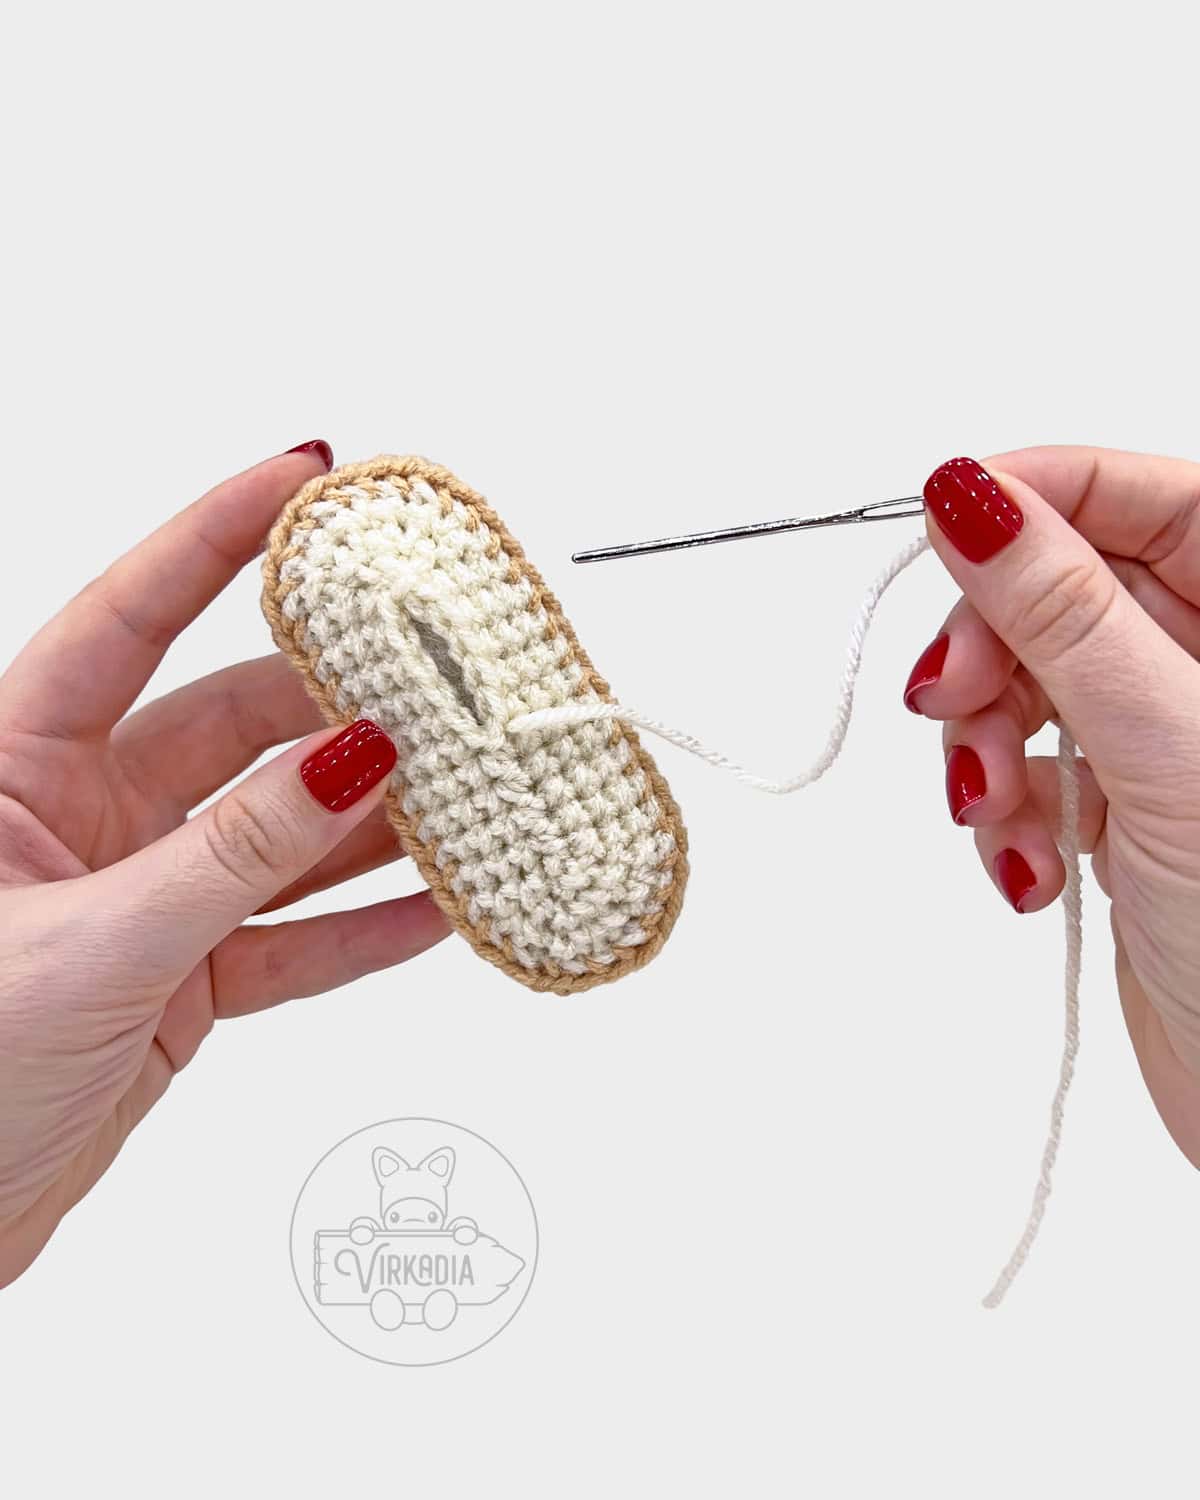
To sew the bottom hole closed, squeeze the bottom of the bun together to form two parallel lines of stitches.
Then, thread your needle through each matched pair of stitches in a straight line across. Secure your sewing with a knot, trim the tail, and sew in any remaining length.
Set aside your first bun for now. Repeat rounds 1 to 10 of the crochet hot dog bun to create a second bun.
Your second bun will be made the same way, with the exception that you may omit the instructions for adding the eyes, mouth and blush.
Sewing Together:
Once you’ve completed your second bun, retrieve the first bun you’ve set aside earlier.
Align both buns together so that rounds 7 to 10 of each bun are laid flat against each other.
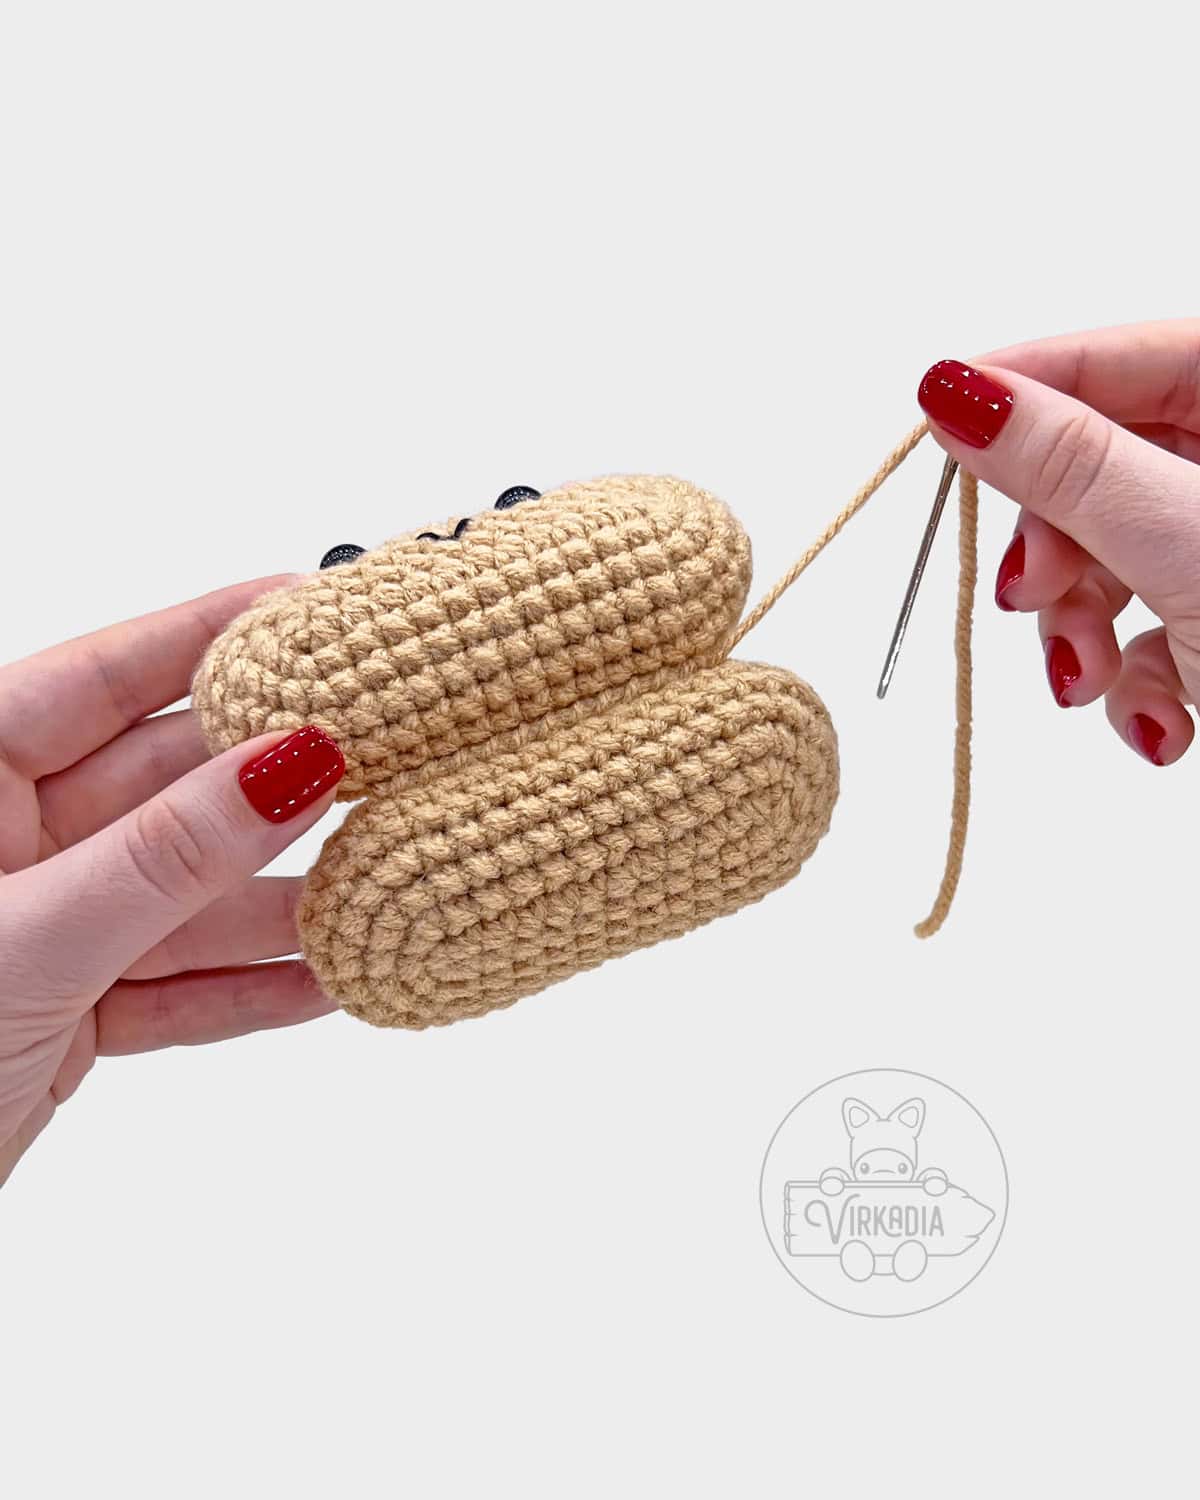
Then, with a length of yarn C (beige), sew the bottom edge of both buns together, through the front loops only that are left over from round 6 of each bun.
For best results, try sewing the middle 12 stitches of the bottom edge of each bun only.
Secure your sewing with a knot, trim your tail, then weave in any excess length.
Finally, retrieve your crochet hot dog that you’ve set aside earlier and place it into the opening of the bun to complete your piece!
Conclusion | Free Crochet Hot Dog Amigurumi
And with that, you’re done the free crochet Hot Dog Cutie pattern! If you enjoyed this pattern, be sure to check out its companion pattern in the Food Cuties collection: the Hamburger Cutie!
You can also explore the Cutie Collections and the Pocket Pets archives for more original and free amigurumi patterns, or our Home Decor Patterns for other homemade household goodies!
If you’re looking to cozy up with a longer project, check out our Clothing Patterns, or assemble your own designs from one of our Granny Square Patterns!
And don’t forget to browse our downloadable, ad-free patterns in our Etsy store!
Follow Virkadia on Instagram to stay updated on all new and upcoming patterns, crochet content, and amigurumi adventures! Thank you for all of your support!
Crochet Hot Dog | Free Pattern

Add some DIY party decorations to your next summer barbecue with our free crochet hot dog amigurumi pattern!
Materials
- Medium (4) weight yarn in 4 colors
- 10 mm black safety eyes (x2)
- Black embroidery floss
- Pink embroidery floss or pink yarn
- Polyester fiberfill
Tools
- Size H-8 (5 mm) crochet hook
- Yarn needle
- Scissors
- Stitch markers
Instructions
Read below for the condensed instructions for the Hot Dog Cutie pattern by Virkadia.
This condensed version is not recommended for first-time projects. For the detailed tutorial (with photos), please see the full-length pattern above.
Tired of ads? Check out our ad-free PDF download, available for purchase on Etsy!
And don’t forget to add your project on Ravelry!
Crochet Hot Dog – Rounds 1 to 5:
With yarn A, make a magic ring (or ch 2, work rnd 1 into 2nd ch from hook).
Rnd 1: 6sc into ring, join, ch 1 (6).
Rnd 2: 2sc x 6, join, ch 1 (12).
Rnds 3 to 5 (3 rnds): 1sc x 12, join, ch 1 (12).
Review the instructions for adding the mustard before continuing.
Adding Mustard:
Rotate your hot dog so that it is horizontal, with your last round facing sideways.
Following along with the chart below, use surface crochet to add slip stitches across the top surface of your hot dog.
Since you will be pulling the yarn for your slip stitches from the inside of your hot dog, it is recommended to work this method as you go.
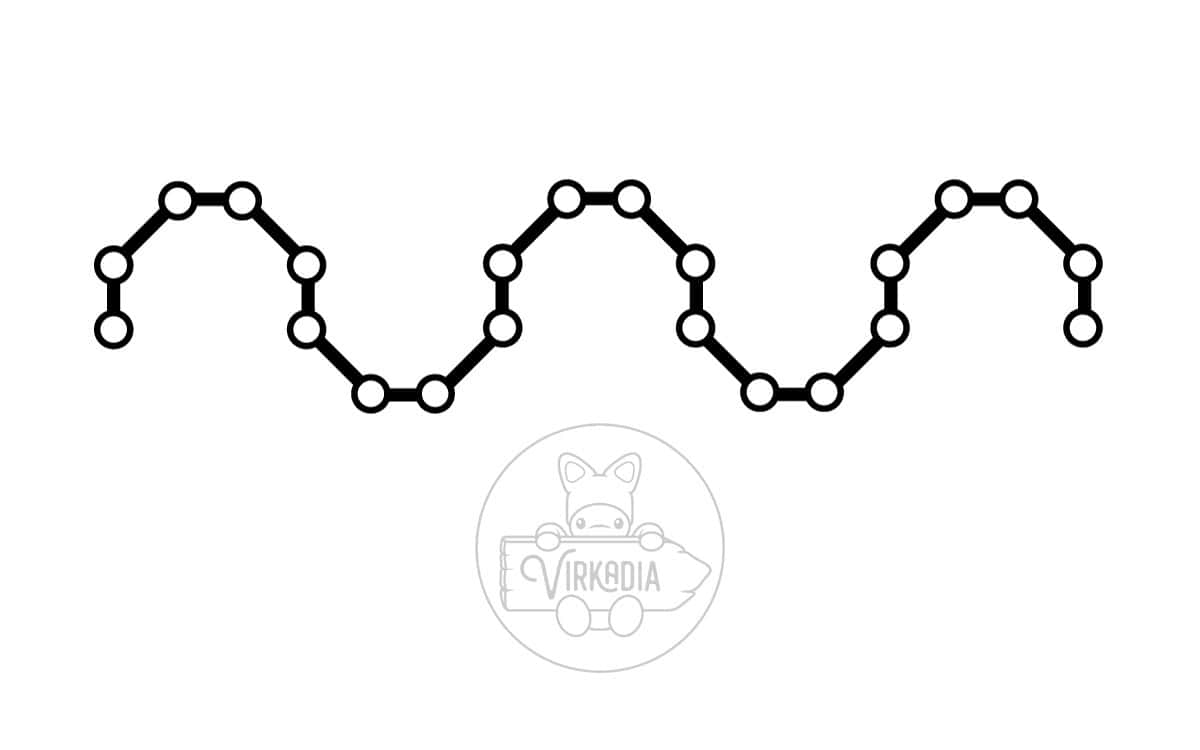
On the opposite side from your joining seam, insert your hook through the surface of your piece, from outside to inside, between rounds 4 and 5.
With yarn B, yarn over on the inside of your piece and pull a loop through the surface of your hot dog. Secure your beginning tail on the inside of your piece and cut any excess length.
Insert your hook again, 1 stitch higher, but still remaining between rounds 4 and 5.
Yarn over on the inside of your piece and pull through the surface and the loop on your hook to complete your first surface crochet slip stitch.
Continue working surface crochet slip stitches according to the chart above, pausing to add more rounds to the hot dog when necessary. Stuff as you go.
To finish your mustard, cut and pull your end tail completely through your last slip stitch, then sew your tail back inside through a nearby space. Secure with a knot and cut any excess length.
Crochet Hot Dog – Rounds 6 to 22:
Rnds 6 to 21 (16 rnds): 1sc x 12, join, ch 1 (12).
Before continuing, make sure your mustard surface crochet is complete and your hot dog is fully stuffed.
Rnd 22: sc2tog x 6, join (6).
Fasten off and leave a tail for sewing closed.
Sewing Hot Dog Closed:
To sew the top hole closed, pass the needle, from front to back, through the front loop only of each stitch around and then pull tight.
Secure your sewing with a knot, trim the tail, and sew in any remaining length. Set aside for now.
Crochet Hot Dog Bun – Rounds 1 to 6:
With yarn C, chain 13.
Rnd 1: beginning in 2nd ch from hook, 1sc x 11, 2sc, working into other side of ch sts, rep from * to * x 1, join, ch 1 (26).
Rnd 2: [2sc, 1sc x 10, 2sc x 2] x 2, join, ch 1 (32).
Rnd 3: [1sc, 2sc, 1sc x 11, 2sc, 1sc, 2sc] x 2, join, ch 1 (38).
Rnd 4: [2sc, 1sc x 12, 2sc, 1sc x 2, 2sc, 1sc x 2] x 2, join, ch 1 (44).
Rnd 5: 1sc x 44, join, ch 1 (44).
Rnd 6: 1sc x 44, join (44).
Fasten off and leave a short tail for tying.
Add the eyes, mouth, and blush before continuing to round 7.
Adding Face:
Rotate your hot dog bun so that it is horizontal, with your joining seam angled towards the bottom.
Insert both safety eyes through the top front of your piece between rounds 3 and 4, or between the 3rd and 4th rounds down from the top edge of the bun.
The eyes should be centered in the middle of the top half of the bun, and should sit 6 stitches apart, from the center of one eye to the center of the other.
Then, embroider a mouth using black embroidery floss over top of round 2. The mouth will be 2 stitches wide and 1 round tall, centered between the eyes.
Lastly, embroider a blush line using pink embroidery floss or yarn next to each eye, between rounds 2 and 3.
Crochet Hot Dog Bun – Rounds 7 to 10:
Begin stuffing as you go. Take care not to overstuff your piece!
Join yarn D into the back loop only of the first stitch from round 6.
Rnd 7: in BLO, [sc2tog, 1sc x 12, sc2tog, 1sc x 2, sc2tog, 1sc x 2] x 2, join, ch 1 (38).
Rnd 8: [1sc, sc2tog, 1sc x 11, sc2tog, 1sc, sc2tog] x 2, join, ch 1 (32).
Rnd 9: [sc2tog, 1sc x 10, sc2tog x 2] x 2, join, ch 1 (26).
Rnd 10: sk 1 st, 1sc x 10, sc3tog, 1sc x 10, sc2tog, join (22).
Fasten off and leave a tail for sewing closed.
Sewing Bun Closed:
To sew the bottom hole closed, squeeze the bottom of the bun together to form two parallel lines of stitches.
Thread your needle through each matched pair of stitches in a straight line across. Secure your sewing with a knot, trim the tail, and sew in any remaining length.
Set aside for now and repeat rounds 1 to 10 of the crochet hot dog bun to create a second bun, with the exception that you may omit the instructions for adding the eyes, mouth and blush.
Sewing Together:
Align both buns together so that rounds 7 to 10 of each bun are laid flat against each other.
With a length of yarn C, sew the bottom edge of both buns together, through the front loops only that are left over from round 6 of each bun.
For best results, try sewing the middle 12 stitches of the bottom edge of each bun only.
Secure your sewing with a knot, trim your tail, then weave in any excess length.
Retrieve your crochet hot dog and place it into the opening of the bun to complete your piece!
Conclusion:
Explore our Patterns page for more crochet home decor projects, amigurumi patterns, and clothing designs!
Follow Virkadia on Instagram to stay updated on all new pattern releases, and share your projects with #virkadia or by tagging us!
And don’t forget to browse our downloadable, ad-free patterns in our Etsy store!
Thank you for all of your support!

Hey hey, I'm Joey Diehl!
I am the fiber artist behind Virkadia! I have a BFA in Fibers & Material Studies and have been crocheting for over 20 years. I have designed, photographed, and written dozens of original crochet patterns that I am honored to have been shared to hundreds of thousands of readers.
Leave a Reply